The temptation is to pull on a jacket, take a spade out there, and get started. But you need to stop yourself from jumping straight in without thinking – and make sure the soil is ready for working first, along with a few other important spring preparations. What are some things you should look out for, or even prepare for, come springtime in your garden? Let’s take a look to get you ready for the new gardening season.
Your Soil: Is it Ready to Work?
The first order of operations for spring – checking your soil. Ask yourself: can I even work the soil yet, whether for planting or maintenance? As I said before, you might be excited to get out into your garden right away in the spring. But if the ground is too frozen and compacted to work with, you may have to rely on your patience instead – until it thaws enough for you to get digging. Working the earth when it is still too frozen and wet may compact some areas of your garden too much – and plant roots do need loose soil to thrive. So, first things first: if the ground is still too hard to work, wait for it to thaw more! And before you plod out to your garden, do what the old gardeners always did: pick up a handful of the earth. If it can be squeezed into a ball easily and you’re able to mold it like Play-Doh, it is still far too wet. Ideally, the material should be slightly crumbly, and without any excess water – and all signs of frost should be gone. Of course, you can work a sandy and coarse textured soil much earlier than a clay soil, because the drainage will be better.
- Fine particle clay – forms a ball in the hand, even when there is less than fifty percent water.
- Sandy or silty loam – will form a ball at around fifty percent moisture.
- Coarse, sandy soil – will only form a ball at about seventy-five per cent. Another test to see if the soil is workable is to take a handful, compress it into a clump, and then let it fall from waist height to the ground. If the material shatters into pieces and falls apart, it is probably ready to be used. If the ball stays in one piece, it is still too wet to work. Trying to start when the ground is too wet is not only difficult, but it can compress it and result in poor soil health for the rest of the season.
Still Too Wet – Other Jobs Beckon
If the soil is still just too damp, be patient, and distract yourself with other important spring garden tasks in the meantime. The following are some of my favorite go-to chores:
Fences and trellises that support climbing plants can all be checked for minor repairs. This is always much easier done when foliage is absent, and saves hassle later in the year.
Whilst you are taking stock of everything in your beds or borders, it is also a good time to take away dry and dead parts of grasses and old perennials. Seed heads may look good with frost on them through the winter months, but now is the time to cut them away, so that new growth can come on easier.
There may be some died back annual plants left over from winter, which may need removal before the season kicks in – make sure to pull out completely dead plants that won’t come back, to make room for new ones. The skeletons of last summer’s calendulas or the stems of some perennials that have succumbed to winter weather should be moved to the compost heap.
Before you start off the seeds in the greenhouse, it is a good idea to wash down all of the glass and sweep off benches, and all of those corners where debris has collected.
New crops can be seeded on a kitchen windowsill if no greenhouse is available, but you must choose somewhere with protection from the elements to harden off the young stock before planting in the garden. (Maybe this will be the year that you finally build your own?)
Garden frames also need to be washed and refreshed before the seedlings are put outside to harden off.
On plants that are already robust and established by this time, it’s useful to remove any old and unsightly leaves. You can compost them – but make sure you are not adding diseased leaves to your compost heap, so as not to spread anything to your healthy plants.
Drainage areas and paths are often covered in wet leaves and debris, and this can be collected and moved to the compost heap. Compost piles need all the extra help they can get in the spring, and dead leaves are good organic additions.
If the compost has become soggy over the winter, that too needs to be sorted.
Revitalize a Soggy Compost
Wintertime can bring about a soggy, damp compost as the result of snow, rain, and ice. When spring temperatures start to warm things up again, this is the perfect time to manage all that moisture – and to get your garden compost back on track again!
1. Keep some of the rain off, but don’t let it dry out.
Cover the pile if it has been left exposed.
2. Add materials that will break down and assimilate easily.
Dead grass raked out of the lawn, moss, straw, and pine needles will all help to absorb the moisture and let air into the mix. The more absorbent and finer materials are more useful in drying out a soggy heap. Pine needles help with aeration, but too many will create an acidic mixture. Compost needs a mixture of both nitrogen and carbon. Generally speaking, the balance is about one-third nitrogen to two-thirds carbon.
Carbon includes things like tree prunings, leathery leaves, straw, shredded paper, and wood ash, which take longer to break down.
Nitrogen is gained from flowers, vegetable waste, weeds, seaweed, and coffee grounds.
3. Make sure you have plenty of air circulation.
Compost needs air, and turning the mixture with a garden fork will help in this regard. Break down any matted clumps and shake out the material as you turn it. The right mixture will be moist but crumbly, something that spreads easily around the plants. If the mix is not quite ready when you are preparing the beds, it can be dug into the soil instead, where the process will finish off naturally. This is not absolutely necessary, but it will speed up the process of making the compost the right texture for using in the garden. If you add an activator, cover the top of the heap with some finished compost or some garden soil, as this will help generate to heat inside the heap.
Keep a Lookout for Volunteer Seedlings
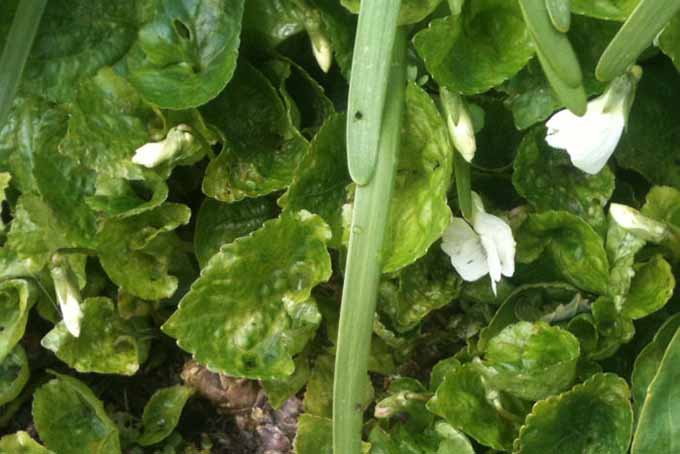
Before adding compost or mulch, or digging up your beds, it may be useful and satisfying to take a good, close look at your garden, to see what nature has provided for free. In other words: sometimes, your established plants from last year might offer some fresh volunteers and new baby seedlings that you can transplant and grow in other areas, for the new season to come! If you have a hard time identifying whether certain tiny seedlings could be desired garden plants (and not just weed sprouts), pay particular attention to seedlings that spring up around a parent plant. If they can be differentiated from other seed sprouts in the bed, they could be volunteers – and some volunteer seedling leaves tend to be very similar to the leaves of their parent plant, too. It would be a shame to lose out on these free plants! And being able to recognize which seedling is which is a useful and valuable exercise for the mind. So before you dig up your bed or mulch over it, thinking that all the sprouting seedlings there are no good – learn to recognize what could be a new, free seedling versus a pesky weed. Another plant from which you can transplant tiny volunteer seedlings to other parts of your garden in spring: Viola septentrionalis, or Northern Blue violet. This is a variety that comes from true seed, unlike better known viola varieties planted from cuttings – and which usually have a lifespan of three or four years. This violet is a true perennial and it forms a strong clump, surrounded by new tiny seedling babies in spring. It’s not a showy flower, though it is breathtakingly beautiful when you look into the face of the bloom. With other hybrid varieties of viola, there are sometimes seedlings to be found as well – and they can surprise you with completely new color schemes. Erodium manescavii is a charming plant that flowers the whole season, and another option that gives you new seedlings without becoming an invasive menace. They are easy to spot too, since they look so much like their parent plants. Astrantia and Aquilegia are also generous with their baby plants. Dig up these finds in clumps to take away and transplant into small pots, for growing in a protected area until large enough to plant out elsewhere. With all these cultivars, and many more, this is a wonderful – and free – way to increase your stock!
Mulch Your Garden, And Pat Yourself on the Back
Once the bed is cleared of weeds, new baby plants are transplanted elsewhere, and the soil is loosened and reasonably dry – a top dressing of mulch can be added over your beds and around the bases of your already established plants. Mulch serves three purposes:
- Helps to feed the soil by adding a bit more organic matter back in (a bit like compost), while also keeping in beneficial soil moisture.
- Improves soil texture as the addition of organic matter improves soil aggregation, drainage, and fertility for your plants.
- Covers bare spots in your beds, where weeds might find a foothold and crowd out your plants. Let’s not forget: a freshly mulched garden makes your plants and yard look neat, tidy, and beautiful too! The beds suddenly take on a smart appearance once you’re done, and you can stand back and admire your handiwork.
Making a Start
Once the time is right to start planting and your footsteps will not do any damage, the spade can be wielded and work may begin. If this is a new bed, turning the earth is useful before adding extra organic material. But for established beds, it is probably best to resist the urge to dig. A newly dug bed may often be protected by placing a sheet of polythene over it until you are ready to plant. This will save the land from being soaked again, and any slugs that collect underneath the sheet can easily be found and removed. It also prevents seedling weeds from germinating before anything else is planted. An established situation will have built up its own tiny ecosystem, but this can be destroyed by overenthusiastic digging. Instead, a top dressing of either well-rotted garden manure or compost will provide nutrients that will filter down through the layers.
Grass Needs Love, Too
In spring, lawns need some tidying treatment! Raking across the surface of your lawn will pull out layers of dead thatch at the base of your grasses, which can then be a useful carbon addition to your compost. Your grass will also benefit from aeration, which can be done simply: by using a gardening fork or cultivating rake to make holes in the soil around your grasses. There are many tools on the market that can make this task easier. What you need really depends on the size of the area to be aerated.
Divide and Conquer
This time of the year is usually the best to divide perennials and increase your stock. These areas have to be kept moist until seeds germinate. At this stage, some people like to add a pre-emergent herbicide or corn gluten fertilizer, such as the Espoma product shown above, to stop the weeds from taking over. For example, if a plant like Hemerocallis or daylily, Helianthemum or rock rose, or a hosta is looking large, it can be taken up in a large clump and split into smaller parts. You can do this with many different plants! The standard way that most guides and gardeners will tell you to do this: put two forks back to back into the center of the clump, and pry the roots apart. A sharp spade might be called for when splitting hard-to-pierce plants, like hostas. Once the first cut has been made, the rest of the divisions usually prove to be relatively easy. A large plant can give you enough to spread new plants around your own garden, and leave some to give away to friends. These sections can also be potted up. In fact, plants like hostas do amazingly well in containers. Remember to water in planted divisions wherever they are. This settles the soil in snugly around the roots, and helps to prevent transplant shock – which can be caused by air pockets that stop fibrous roots from finding the feed and moisture they need for growth. This can happen if freshly transplanted cuttings don’t get enough water, or if they lack adequate soil contact to their roots. Above is a Hosta reversa, which could provide at least six new plants if divided. Even though it will not yet be in leaf, the full growth span of the plant can be seen, with little nodes of growth appearing through the earth. This is a good time to make divisions, and the new plants have the whole season to settle in. Spring is also a great time of year to divide snowdrops. You can, of course, buy bulbs and plant these later in the year instead – but it has been found that dividing clumps “in the green” enables the flower to spread and become established more quickly. Some people collect snowdrops by planting new and different varieties, and buying bulbs is a great way to grow your collection. Specialist nurseries for collectors can easily be found on the internet. This depends on the species and variety – check growing guidelines to see if your plants are ready to settle themselves in, and build up food supplies for the following year. Do you have other bulbs or plants that have flowered in pots and tubs? Some of these can be planted out in the garden after they have finished flowering.
Tree Tidying Time
Early spring is an excellent time to neaten up your trees. It’s best to cut back trees when you can clearly see the branches, and before any new growth starts – whether leaves or flower buds. Early spring flowering shrubs and trees are the exception to this rule, and should be left alone until later in the year. Similarly, it’s best to transplant any trees that need relocation before they start to bud. Also make sure to check that ties already in place are not too tight, or cutting into trunks that have grown over the past year. Proponents of ikebana, or Japanese floral art, use a system of pruning that works well for tidying a non-flowering tree in the spring. This can be done by removing any branches that cross over each other. Removing one of the crossed twigs stops the pieces from rubbing against each other prevents damage and disease to the tree, and also beautifies the growth patterns and habits of the plant in the eye of the beholder – evoking the essence of the ikebana art. It also has the effect of opening up the canopy a little. And in the case of ikebana, this is said to relieve stress in the person viewing the branch. All dead and decayed wood should be cut away as well, and you should also remove any remaining withered foliage that’s retained from the year before.
Stop and Tend The Roses
Roses can be pruned in much the same way that trees are tidied. Hybrid tea roses are a fantastic example of cultivars that benefit significantly from pruning. Here’s what you need to do:
Take out anything that is crossing or causing damage.
Cut any branches above a shoot that is pointing outwards, so that the shape of the bush is improved – allowing light and air inside the structure of the rose bush.
One technique suggests it is possible to take a chainsaw across the shrubs with the same effect as individual pruning. While this may feel like an extreme way cut to your bushes, a good display of flowers will still appear later in the season! The shape of the shrubs will not be improved using this method – but this does show that you should not be afraid of cutting back your roses if need be! They will continue to flourish and flower. Rambling and climbing varieties will need their long stems cut back. The ones you want to keep should be tied to supports, like trellises, stakes, fences, and the like. Some rambling varieties (like the famous Kiftsgate rose) are so vigorous that they can clamber up into the tall branches of trees, using them as a support.
Vegetables Can Be so Satisfying
Let’s return to the beds that you turned and covered with polythene, mulch, or compost. When it’s time for getting these ready for veggie planting, first you must take off any covers and double-check the soil. Remember: if the soil is dry and crumbly, it is ready to prepare for growing vegetables! If it’s still frozen, you’ll have to wait a bit longer. Using a rake, spread the soil around in your desired bed until it is level, flat, and even. Feel free to lightly press it down with the back end of your rake or another gardening tool, to make a nice-looking bed. Rake out the last remaining bits of weeds or other matter, and pull out any large stones. Rake until you have soil that’s easy to work, with a soft, crumbly texture. A good organic fertilizer or compost can be added before the final rake, and then you are ready to plant your early crops. Which early veggies to plant? The following are some popular varieties:
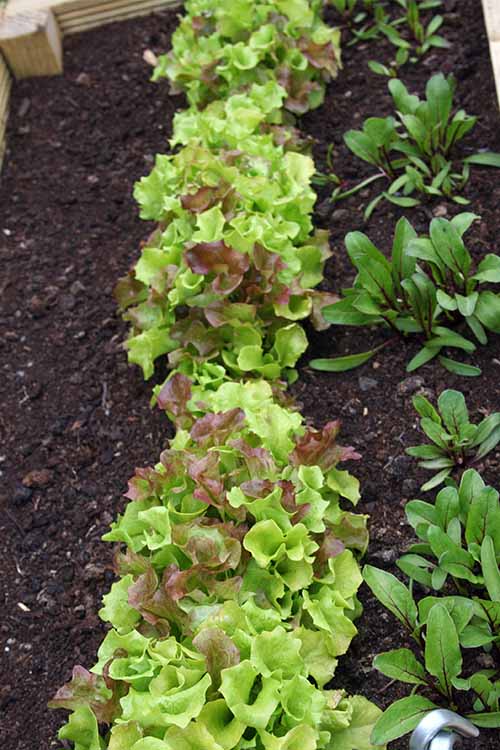
Cabbage Kale Lettuces Onions Potatoes
Just be sure to cover more vulnerable vegetables with mulch or other protection, if the temperature is predicted to drop below freezing – lettuce in particular is a sensitive plant! If you have beds of strawberries or other perennial plants that have overwintered, the same advice applies. Take off the old foliage, carefully loosen the soil a little around the roots, add some compost as a side-dressing. And remember to avoid adding any diseased foliage to the compost heap – you don’t want it contaminating your other plants! With permanent garden beds containing live, over-wintered perennials, support can be added at this stage to some taller, stalky plants (like annual larkspur, delphinium, Russian sage, and pampas grass). This will help them to grow upright and correctly. There are lots of purpose-built plant holders on the market (especially stakes, trellises, and cages), but sometimes large twigs saved from pruning your trees can be inserted into the soil next to your desired plant – forming a natural trellis, stake, or support for its growth. Tall, late season asparagus, for instance, can be kept upright with some support from staked, pruned tree branches, especially if you are displeased with its fern-like growth falling over in the wind. Its feathery stems and leaves will cover these natural stakes, making them quite unnoticeable. Take stock of your garden, enjoy the brave plants already showing their faces, and prepare for the rest of the year. Work done now will pay off with super results later in the season. For more springtime gardening tips, you’re going to want to keep our checklist close at hand. Feel free to connect with us, share your own spring prep ideas, and comment below. We’d love to hear from you! © Ask the Experts, LLC. ALL RIGHTS RESERVED. See our TOS for more details. Uncredited photos: Shutterstock.