Combine this climbing ability with quick growth, beautiful fall foliage, and versatile toughness, and you’ve got yourself an all-star planting! We link to vendors to help you find relevant products. If you buy from one of our links, we may earn a commission. The necessary winter care practices aren’t ridiculously labor-intensive, but you’ll need to know what to do in order to keep your Boson ivy alive and well throughout the dormant season. This guide will walk you through caring for Boston ivy in winter, with topics ranging from the items you’ll need to the step-by-step methods to use in your own garden. We’ll even cover the benefits to proper winter care practices, which should help a bit on the motivation front. Here’s what’s on the docket:
Why Even Bother with Winter Care and Maintenance?
It’s natural to want an off-season from your hobbies every now and then. If you’re a gardener who has labored and toiled over your plants in spring, summer, and fall, you might feel like you deserve a wintertime break. While you’ve certainly earned it, there are benefits to continuing to actively care for your Boston ivy from December to March.
Aesthetics
Pruning is one of the greatest tools we have as gardeners for shaping and forming our plants to look the way we want them to. For P. tricuspidata, winter is prime time for pruning because the leaves have dropped and you can better make out the “skeleton” of the plant, so to speak. It’s much easier to make visual edits during this time, when the foliage is out of the way and you won’t have vigorous regrowth to deal with that’ll rapidly undo all of your hard work.
Health
As you prune, you’ll likely find damaged, dead, and/or diseased stems that need snipping. Cutting away these structures does away with infections already present, as well as eliminating potential entry points for future pathogens.
Protection
Young and tender Boston ivies will need some additional insulation during the winter. Adding mulch atop these juvenile plants will keep them warm and safe from harm. The first things you should prune are diseased, dead, or damaged stems. These structures present the largest health risks to the plant, and should therefore be given top priority.
Hand Pruners
Hand pruners are a gardener’s go-to tool for making small pruning cuts. Bypass pruners are ideal, as they prolong the blade’s sharpness while also making clean cuts. Bypass Pruners For a pair of rubber-gripped bypass hand pruners that come in either rose gold or sky blue, head on over to Garrett Wade.
Mulch
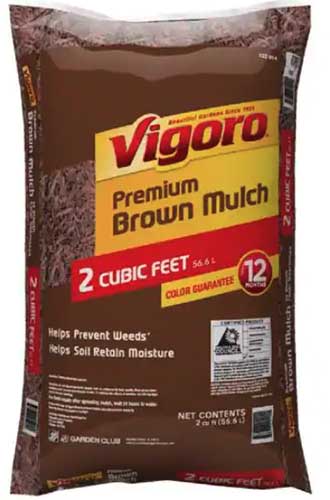
An essential requirement for mulching is mulch… which you probably could have guessed. Wood chips are the perfect material for protecting a woody vine such as Boston ivy. Wood Chip Mulch Vigoro sells two-cubic-foot bags of mulch in red, brown, or black at The Home Depot.
Mulching Fork
You could certainly barehand mulch, and it would work just fine. A mulching fork, however, will make the job that much easier. Plus, you can do that back-and-forth twisting motion on the shaft of the fork for an even mulch distribution, while conveying the appearance of a seasoned gardener – whether you truly are one or not. Mulching Fork For a 51-inch mulching fork that’s entirely made of steel, visit Garrett Wade.
How to Care for Boston Ivy in Winter
Once your Boston ivy has lost its leaves and winter begins, it’ll be time for pruning. Technique-wise, make your cuts right above a node. This will help to prevent potential infection and dieback. After that, start making pruning cuts to keep your P. tricuspidata in bounds. If it’s encroaching on other plantings, trespassing onto someone else’s property, or climbing up buildings where it shouldn’t be, give the offending stems the ol’ slice ‘n’ dice. When pruning stems that are affixed to structures, don’t yank them off before making your cuts. Instead of using itty-bitty roots to affix themselves into little cracks and divot surfaces, these vines have adhesive disks that they use for sticking to surfaces. The suction on these structures is crazy strong, so pulling vines while they’re still alive will leave the disks attached, and they are tough to remove. Instead, make your pruning cuts and then allow the cut sections of vine to die before removing them from surfaces. Once they’re dead, they’ll come off nice and easy. All of this pruning should happen in a single session, ideally. When you’re pruning, don’t remove more than a third of the plant’s woody mass. After pruning is complete, it’s time to mulch. A thickness of three to four inches should be sufficient protection. Check on the mulch periodically during the winter for wind or weather disturbance, and remove the mulch in spring after the final frost. Watering and fertilizing are hardly necessary during the growing season for these plants, much less in the dead of winter. So don’t worry about providing any supplemental irrigation or fertilizer. However, now that you know that the work required isn’t all that backbreaking, hopefully you feel less apprehensive about adding the necessary wintertime maintenance into your gardening routine. Heck, you’ll probably be able to finish it all in a single schedule-cleared day, if you really get after it. Any personal experiences, questions, or other remarks can go into the comments section below. I’d love to read and respond! If this guide has you interested in growing other types of vining plants, check out these guides next:
How to Plant and Grow Virginia CreeperHow To Grow and Care for ClematisHow To Grow and Care For Passionflower
