We link to vendors to help you find relevant products. If you buy from one of our links, we may earn a commission. However, the similarity stops there because beneath the cuddly cuteness of old man cactus lie sharp spines, the modified leaves of desert cacti. I caution you at the outset to handle this prickly plant with care! C. senilis is suited to outdoor cultivation in USDA Hardiness Zones 9 and 10. This article discusses all you need to know to grow it indoors in all regions. Here’s what we’ll cover: Let’s get started!
What Is Old Man Cactus?
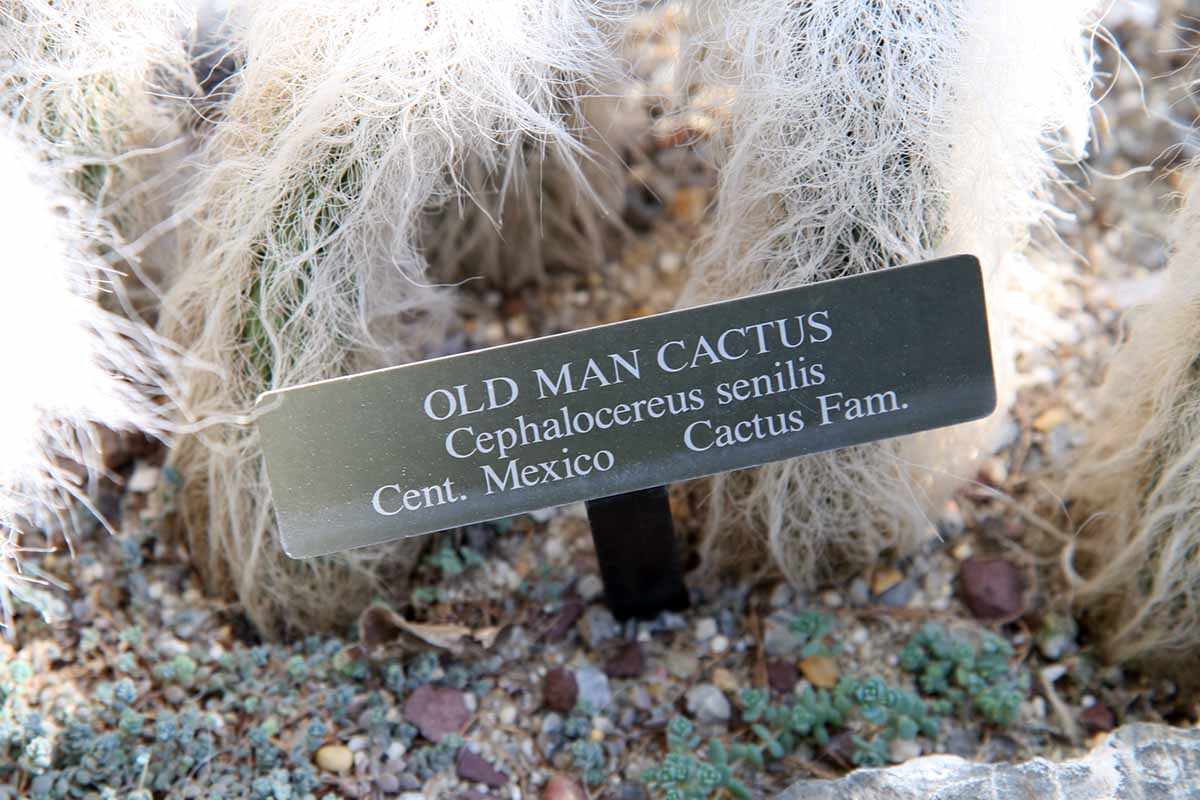
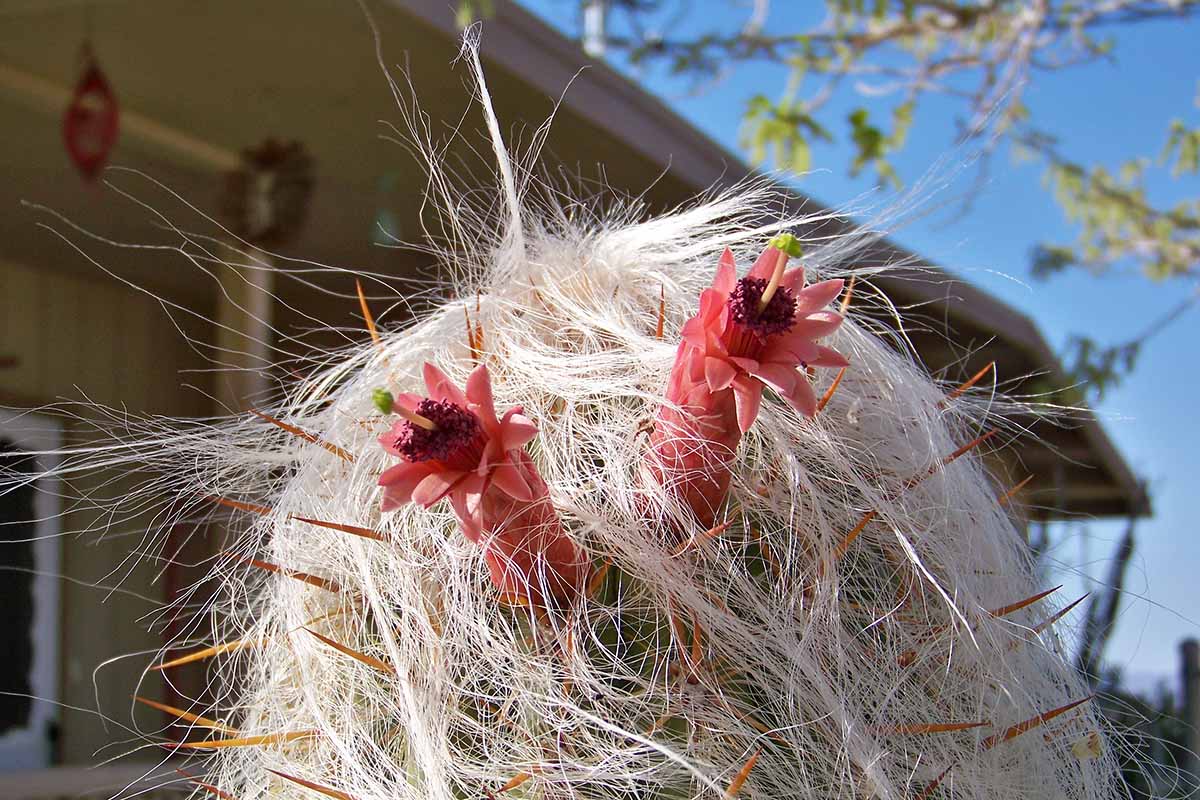
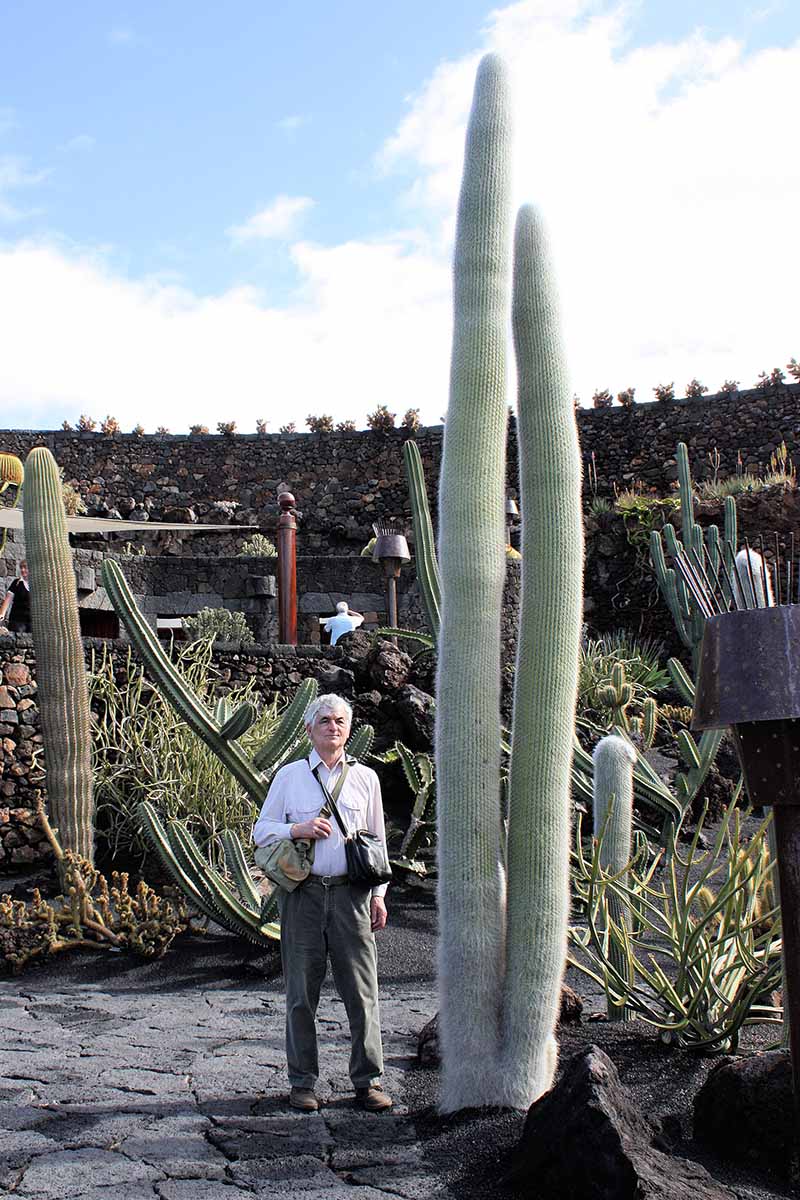
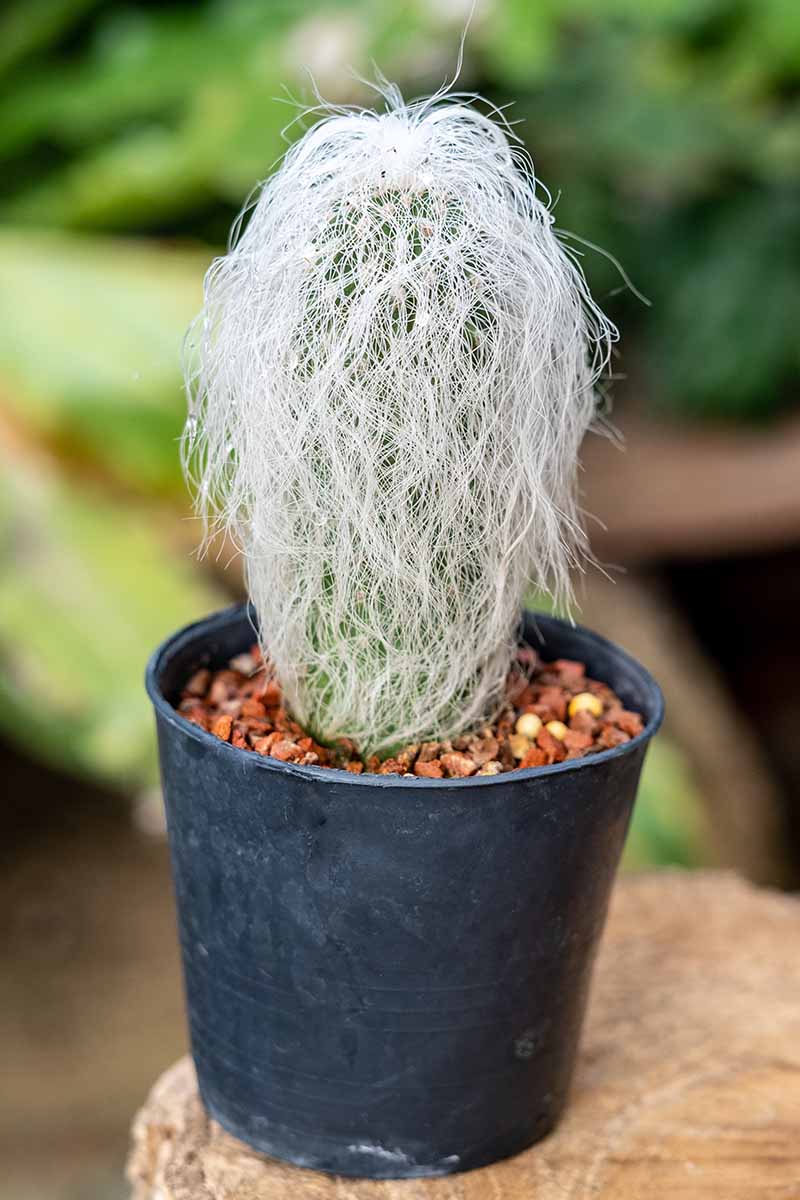
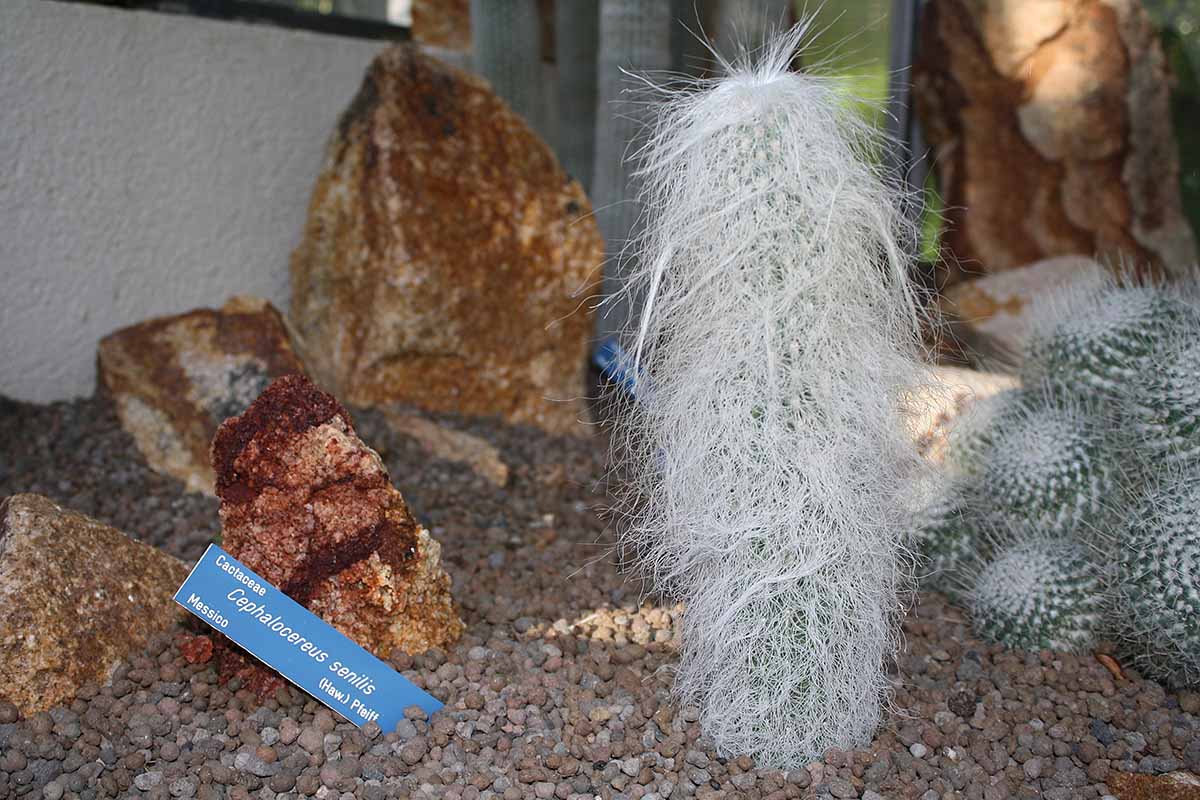
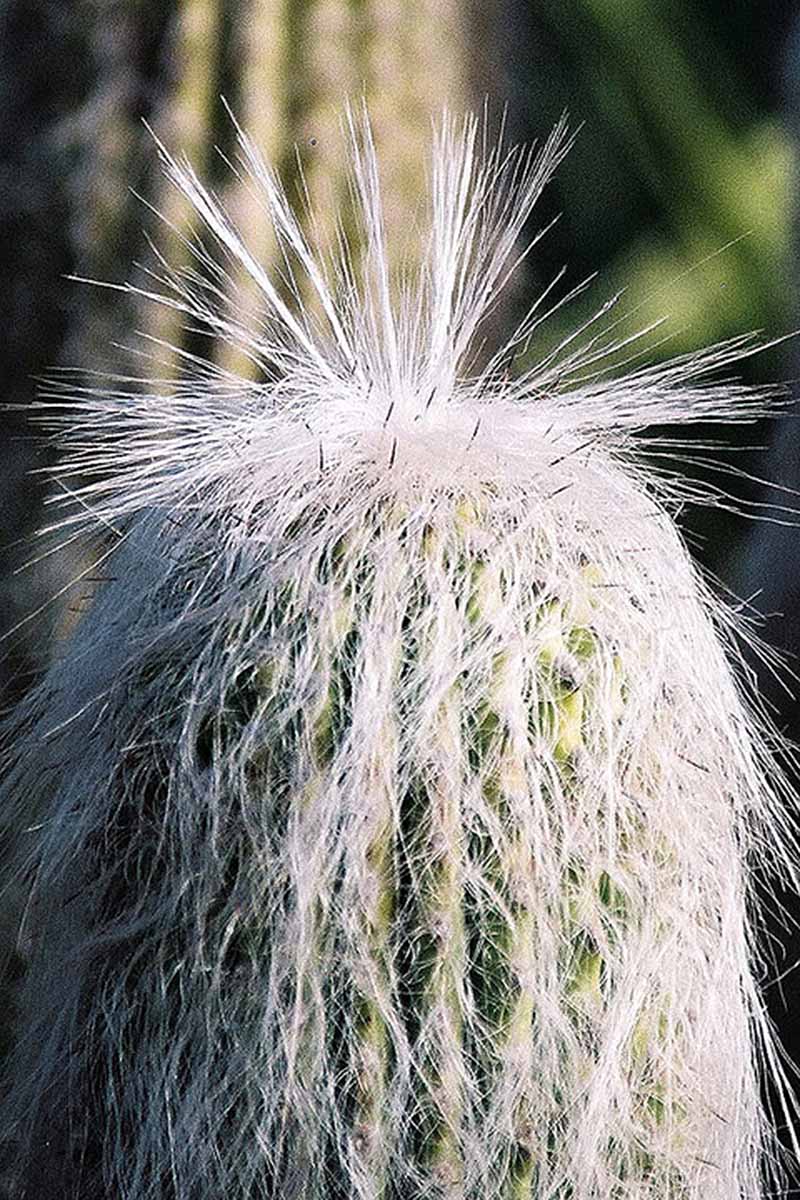
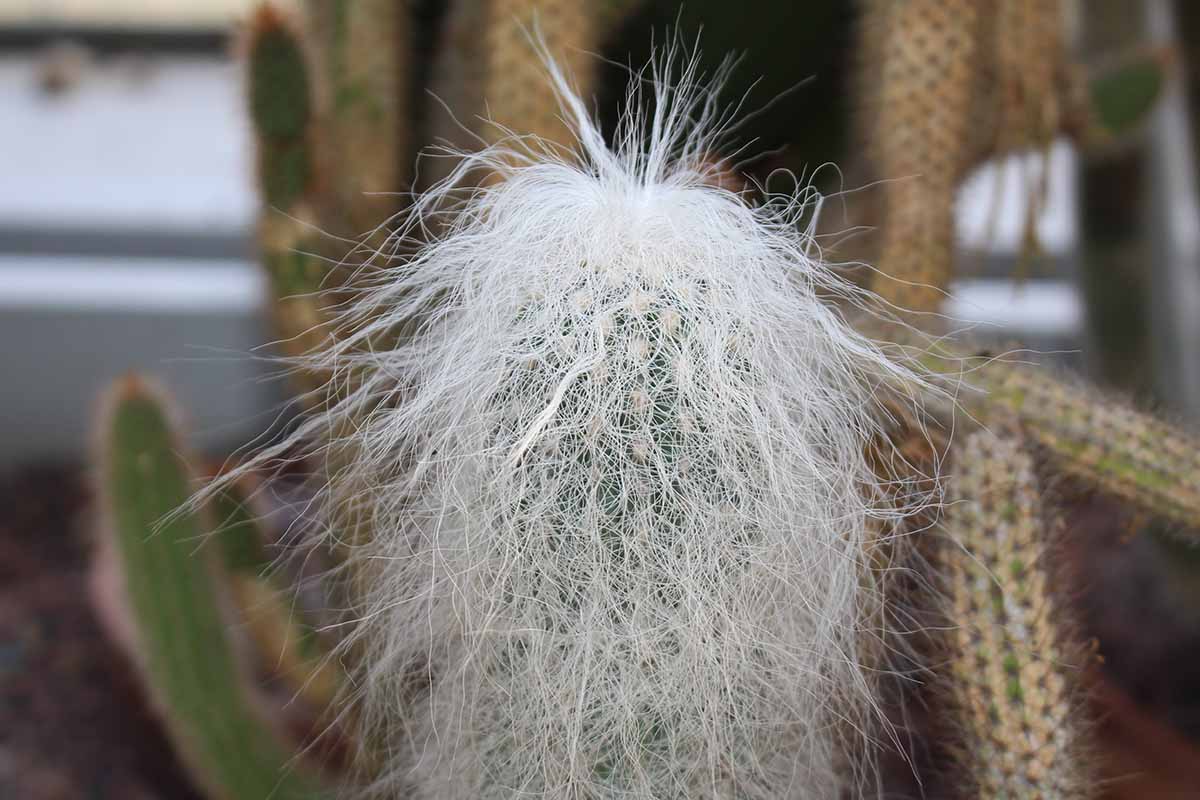
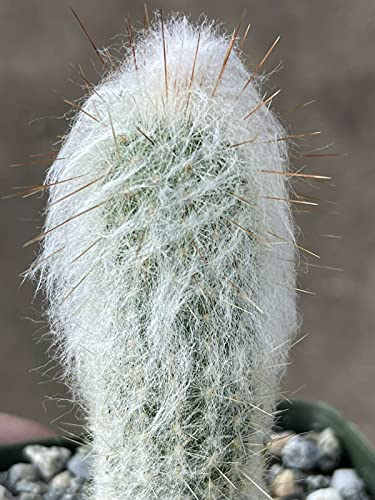
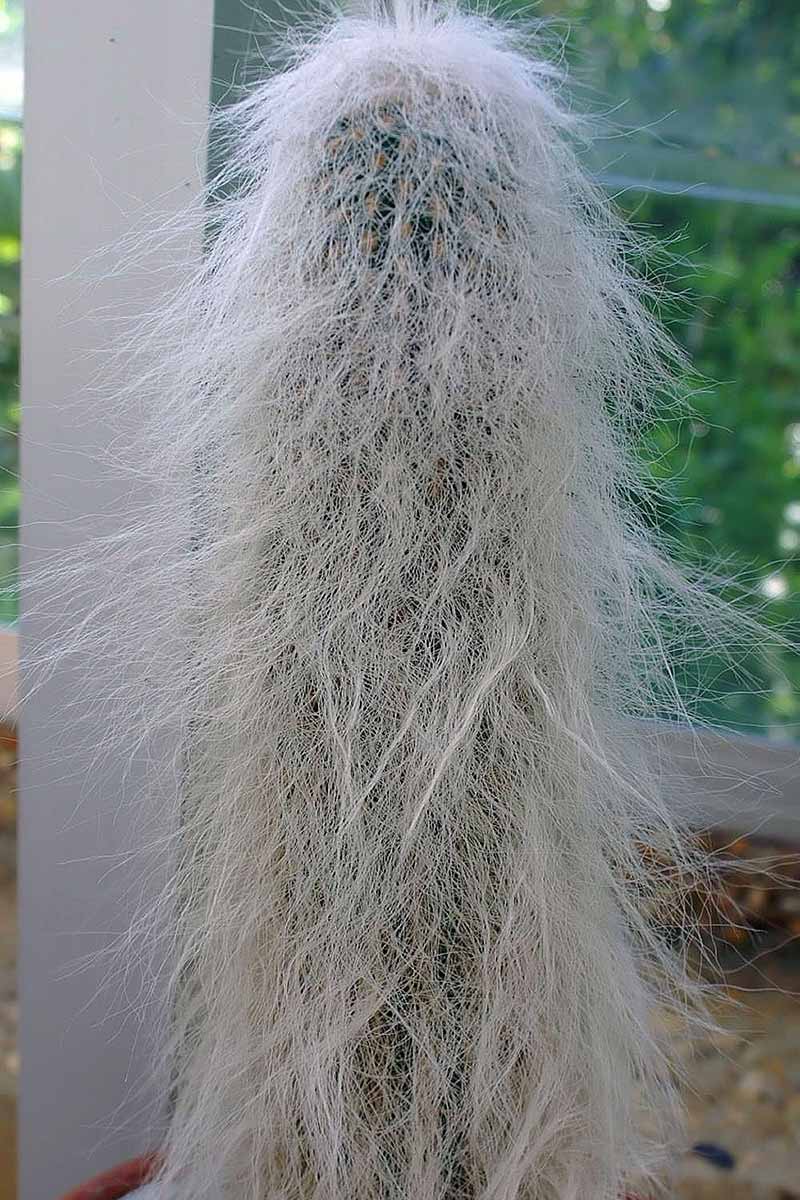
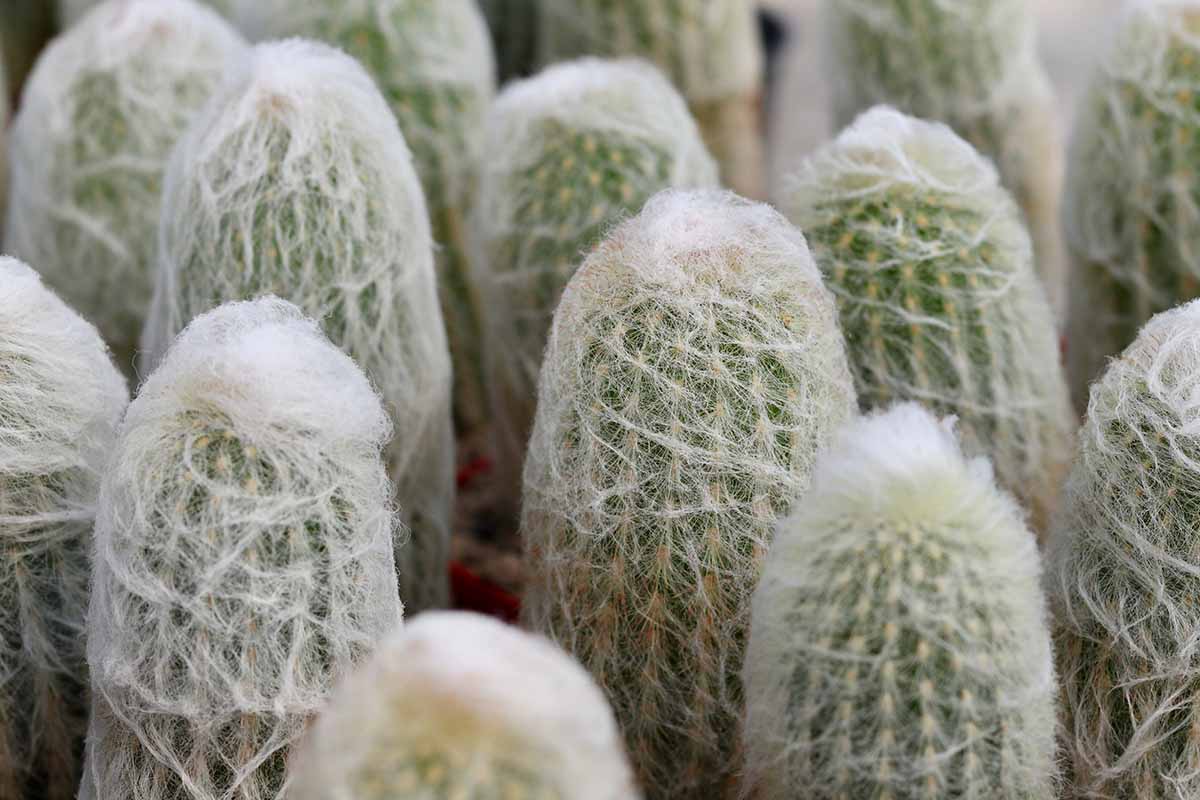
Old man cactus is endemic to eastern regions of Mexico. It is endangered in its native habitat, but commercial cultivation ensures a ready supply of plants that have not been sourced from the wild for home gardeners. Sometimes referred to as “old man of Mexico,” slow-growing C. senilis has a blue-green column-shaped branchless stem. Clusters of columns sprout side by side. Shallow ribs run up the length of the column. Along the ribs are symmetrically arranged areoles from which three to five sharp yellow central spines protrude. These spines are modified leaves suited to harsh desert conditions. Overlaying the central spines are soft and long radial spines that cover the stem in silvery-white to white “hair.” They insulate the stem from daytime desert heat and cold nights. At between 10 and 20 years old, plants reach maturity and may produce cephalium. This is a fuzzy, reddish-pink flowering protrusion that emerges near the top of the stem and opens at night. These are uncommon on plants cultivated indoors but may appear in the summer on outdoor specimens. In the wild and in outdoor garden settings, mature plants may be as large as 40 feet tall and 12 inches wide. Expect more modest dimensions of three feet tall and six inches wide at max when cultivated indoors. Some of these cacti can exceed 100 years old. Over the years, most of the lower hairy spines of C. senilis fall out while those closest to the growing tip of the column remain.
Propagation
There are several ways to start a plant of your own, including from seeds, offsets, and stem cuttings, as well as those purchased in nursery pots. Our guide to cactus propagation provides full details. Let’s take a quick look at each method.
From Seeds
While it’s fast and easy to start many plants from seed, such as annual flowers, this is not the case with cacti. Per the pros at the Missouri Botanical Garden, cacti grown from seed can take two to five years to become established. And that’s if you can find them for sale in the first place. A seed packet will typically provide cultivation instructions, but not always. For most types of cacti, this generally includes cold stratification, scarifying, and soaking before scattering them on a moist, sterile potting medium with a thin soil covering to anchor them in place. Germination requires even moisture and bright indirect sunlight. Experts at the Cornell University Cooperative Extension recommend covering the seeded potting medium with plastic or a humidity dome to form a self-watering greenhouse. Seeds generally germinate in three days to three weeks. Once sprouted, they suggest opening the plastic a bit to allow some outside air to penetrate. After three to six months, remove the plastic altogether. Unless the plants become overcrowded, there is no need to transplant them to individual pots until they’re about a year old. To transplant, take note of the depth of the seedlings in their container. Select a porous, well-draining pot for each seedling. It should measure one inch larger than the stem diameter. Fill the pot one-third full of cactus and succulent soil. Set the stem at the same depth as in the original seed-starting container and backfill.
From an Offset
An offset is a baby plant that grows beside a parent plant. Once it has roots, it’s possible to separate an offset from the parent to grow by itself. If you have a friend with a plant, you may ask for an offset. The best time to do so is in the spring, during active growth. Here’s how to perform the separation: Take note of how deep the parent and offset sit in their pot. Unearth the parent and offset. Use a sharp, sanitized garden knife, like a hori-hori, to sever the roots that attach the offset to the parent plant. Immediately repot the offset as we did with the seedling above, to the same depth. Return the parent to its original container.
From a Stem Cutting
To begin with a stem cutting, you’ll need to have access to an existing plant, only this time you’ll ask your friend if you can cut the top off the plant. And while it may be unlikely that you’ll get a resounding “Okay!” you can try. During active growth in the spring, pull on some protective gloves and use a sharp sanitized knife to slice through the stem at least four inches down from the tip. Let the cut end dry and form a hard callus. It can take days or weeks, depending upon the size of the stem, so place it on a dish or paper towel out of the way where it can receive bright indirect sunlight. Some folks dip the callused end in rooting hormone powder before placing it in cactus and succulent soil just deep enough to anchor it. Be patient, as it may take weeks for new growth and roots to appear. In addition to a top cut, you can take cuttings lower down the stem, depending upon its height. However, having two cut ends may make the stem cutting more prone to disease during the callusing period. The remaining stem base will callus over and eventually form new growth. Sometimes stem cuttings are made to save a specimen that is unhealthy at its base due to over- or underwatering. Taking cuttings from specimens that are large in diameter may require a saw instead of a gardening knife. In addition, some gardeners dip cuttings in fungicidal sulfur, lime, or cinnamon, to inhibit pathogen growth during callusing.
From a Nursery Pot
The most realistic way to begin may be to purchase a nursery-raised plant. It may be only a few inches tall or further along in its development when you bring it home. Regardless of age and size, at some point, you’re going to want to transfer it from the plastic nursery pot it came in to a more decorative container. Choose a well-draining one with a diameter one inch wider than the stem. Take note of the depth of the soil surface in the original container. Use a thick towel or garden gloves to hold the cactus as you unpot it. Fill the new pot one-third full of quality cactus and succulent soil. Set the contents of the original container in the new one. Take care to set the stem at the same height it was in the original container. Backfill to hold the stem firmly in place. There should be at least half an inch and no more than one inch of space between the soil surface and pot rim to facilitate watering without runoff. Now let’s move from propagation to growing.
How to Grow
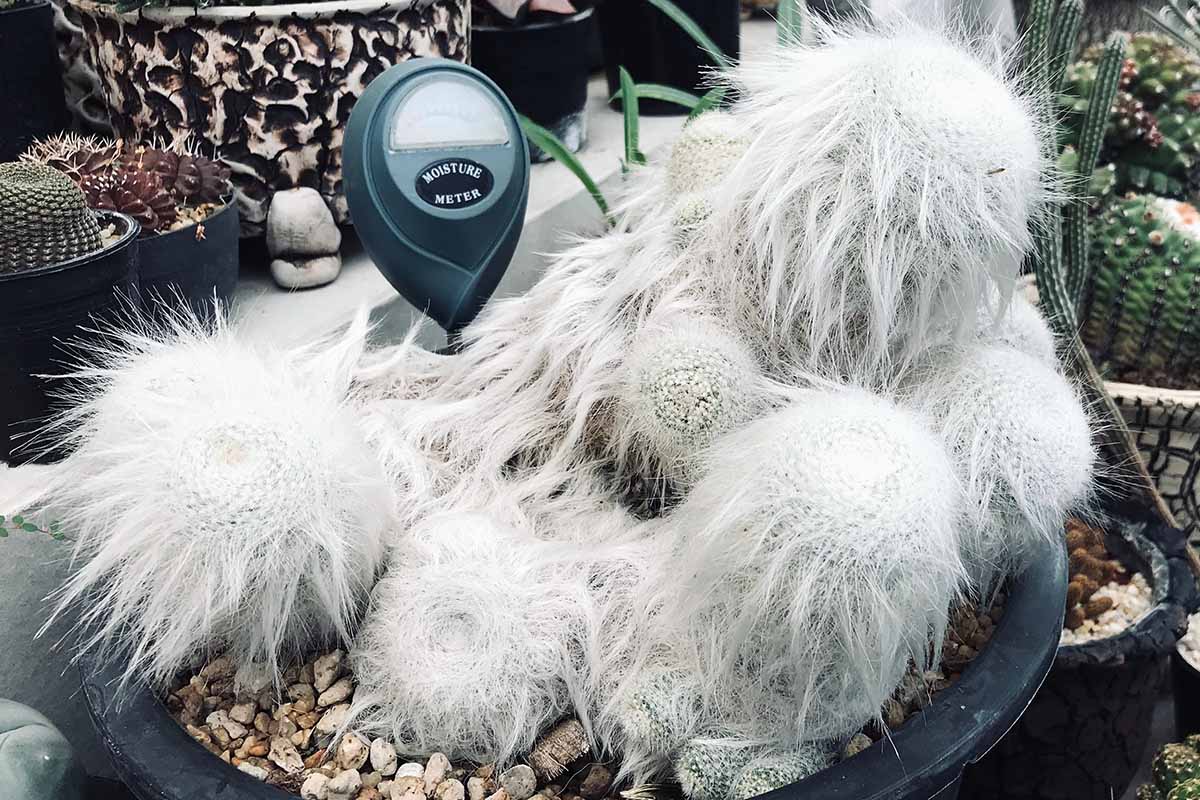
In its native habitat and in outdoor gardens, C. senilis requires a full sun location and well-draining, sandy soil with a slightly acidic pH between 5.5 and 6.5. We can mimic these cultural requirements indoors. Start with a suitable pot. The best container for a desert cactus is made of a porous material like unglazed clay, because this allows moisture to evaporate and prevents oversaturation. One or more drainage holes are essential. There should be at least half an inch of “head space” above the soil surface to permit watering without soil runoff. It’s best to graduate pot sizes as needed rather than starting with an oversize pot because cacti roots prefer to be snug, and planting in too much soil can lead to inadvertent overwatering. Tank’s-Pro Cactus and Succulent Mix Tank’s-Pro Cactus and Succulent Mix contains horticultural pumice, coconut husk chips, and organic compost to promote drainage and support nutrition. As mentioned, when planting in the container of your choice, set the stem at the same depth as in the original container to reduce transplant stress and minimize the risk of rotting. Water using the “dry and soak” method, allowing the soil to dry out completely before you give it a thorough soaking. Use a moisture meter as a guide. Water as needed during active growth and reduce watering during winter dormancy. Choose a south-facing window for optimal daylight exposure – the better the light, the more abundant the hairy spines will be. The ideal room temperature during the growing season is in the 65 to 85°F range. If possible, relocate the pot to a setting with a temperature of 55 to 60°F during winter dormancy. This desert species is accustomed to dry air, so the lower the humidity, the better. If summer humidity is a problem in your home, consider running a dehumidifier along with your air conditioner to lower it. Per the National Asthma Council, 30 to 50 percent humidity is the most comfortable range for people, so don’t go too low.
Growing Tips
This slow-growing cactus is easy to give a healthy start when you:
Choose a well-draining porous pot.Use a well-draining, nutrient-rich cactus and succulent soil.Water with the dry and soak method and reduce watering during dormancy per a moisture meter.Provide bright indirect sunlight.Maintain a temperate room during the growing season and relocate to a cooler room during winter dormancy.Reduce indoor humidity to mimic the arid desert, but remain in the recommended comfort zone.
Once established, there are a few gardening tasks to consider.
Maintenance
Cacti generally require little maintenance. However, there are a few tasks you’ll want to undertake for optimal health and appearance.
Water
As discussed above, use a moisture meter and the soak and dry method to water deeply when the pot is completely dry. When watering, allow time for the pot to fully drain before returning to its permanent location. Keep the dish below the pot dry to avoid standing water that may result in rotting.
Fertilize
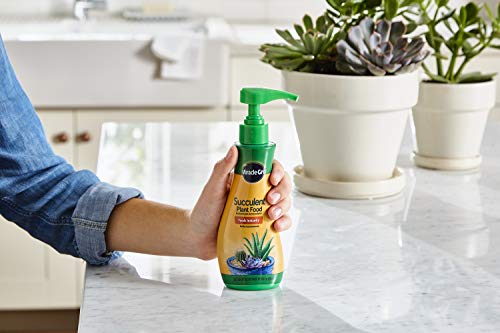
Repot
With this slow-growing species, you will rarely need to repot. Use a half-strength liquid houseplant food formulated for cacti and succulents. It should contain more phosphorus than nitrogen in the N-P-K ratio. Miracle-Gro Succulent Plant Food Miracle-Gro Succulent Plant Food meets the above recommendations. It contains twice as much phosphorus (phosphate) as nitrogen and can be diluted with water. However, if you see roots poking through the pot’s drainage hole, unpot the plant and check to see if the roots are bound or wound tightly around the plant with little visible soil. When the roots are extremely dense, water penetration and nutrient uptake are poor. While cacti prefer a tight fit, once the roots fill the pot, it’s best to go up one pot size and refresh the potting soil. The best time to repot is during winter dormancy, as this causes less stress than it would during active growth.
Shampoo
And finally, give your cactus a spring shampoo. Airborne dust, age, bugs, and soil splatter from repotting can discolor the radial spines, detracting from their luster. This is an optional task. Wear gloves and try not to squeeze the sharp central spines beneath the hair. Add a drop or two of baby shampoo or other mild soap per cup of tepid tap water and mix. Cut a hole an inch larger than the stem in a plastic food storage or grocery bag. Bring the cut bag down over the stem all the way to the base to help retain the soil and keep it from becoming soapy during shampooing. Holding the bag around the pot, tilt the pot over the sink and pour the soap suds over the hair. Rotate the pot to wet all of the hair and loosen debris. Rinse the stem under a gentle stream of tepid tap water to remove the soap and debris. Gently comb or brush the hair and pat it dry. Some folks use an old toothbrush. Mind the sharp central spines for your own safety and to avoid damaging them. Return the pot to its permanent location in bright indirect sunlight. In addition to these routine tasks, regularly monitor for signs of the pests and diseases discussed below.
AphidsMealybugsScaleSpider Mites
Read our guides to learn about these common pests. Start small, and increase the pot size as it matures. Remember to use a towel or gloves during transplanting to avoid being pricked by the spines. Old Man Cactus
Managing Pests and Disease
Generally speaking, cacti are not prone to pests and diseases. However, houseplants in dry settings may fall victim to the following pests: As for diseases, there is one to be aware of:
Cactus Root Rot
The water mold (oomycete) Phytophthora cactorum causes cactus root rot. The first sign may be brownish discoloration at the stem base. Severe damage may be irreparable, but you may still be able to take and root a stem cutting and start over. To avoid rotting roots, take care not to overwater, and plant only in a porous medium in well-draining containers.
Best Uses
Cacti are low-maintenance, water-wise houseplants that make eye-catching stand-alone specimens. They also play well with bromeliads, other cacti, and succulent species that share similar cultural requirements. If you live in Zone 9 or 10, consider adding old man cactus to your xeriscaping design scheme outdoors. Whether as a stand-alone specimen or among companions, C. senilis is a species that commands attention while asking little in return. Take out your garden planner today and make room in your indoor garden for this statuesque gentleman of the desert. Do you grow old man cactus? Please share your experience in the comments section below. If you enjoyed reading about this plant, we recommend the following cacti guides next:
35 of the Best Hanging and Trailing Succulents and CactiHow to Grow and Care for Christmas CactusHow to Grow Prickly Pear Cactus