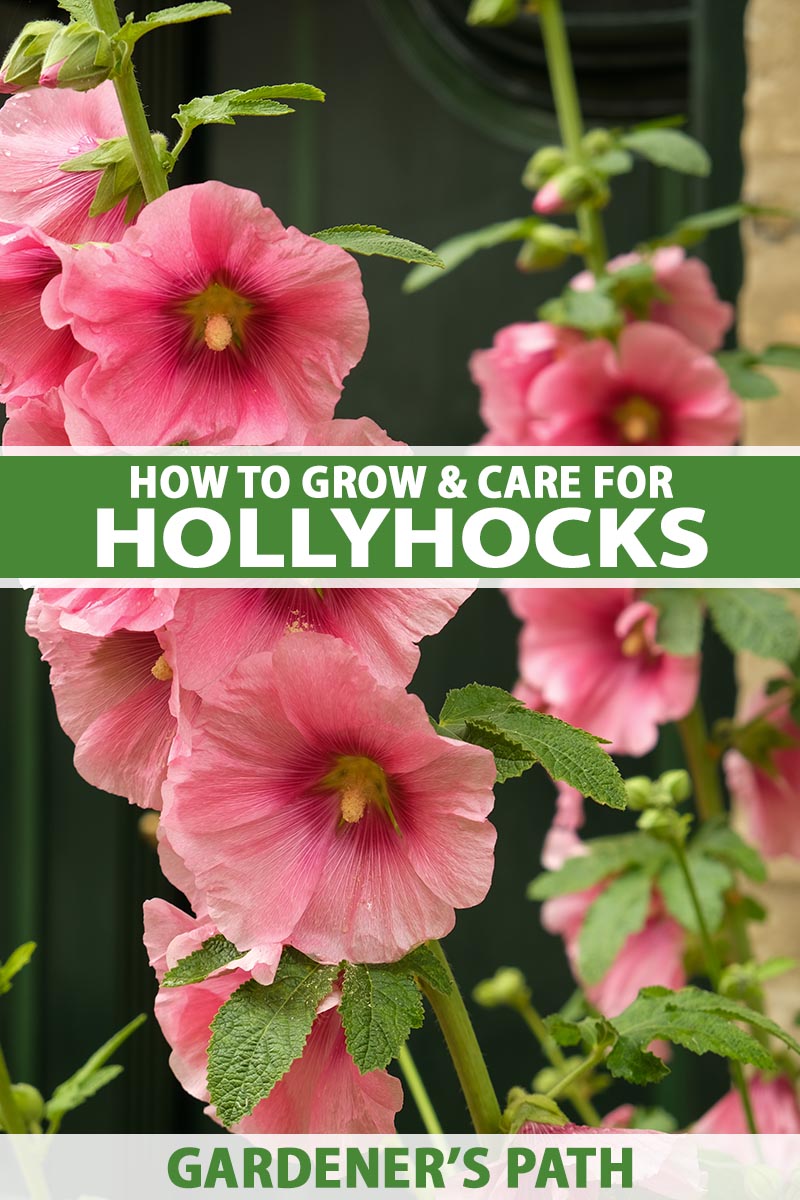
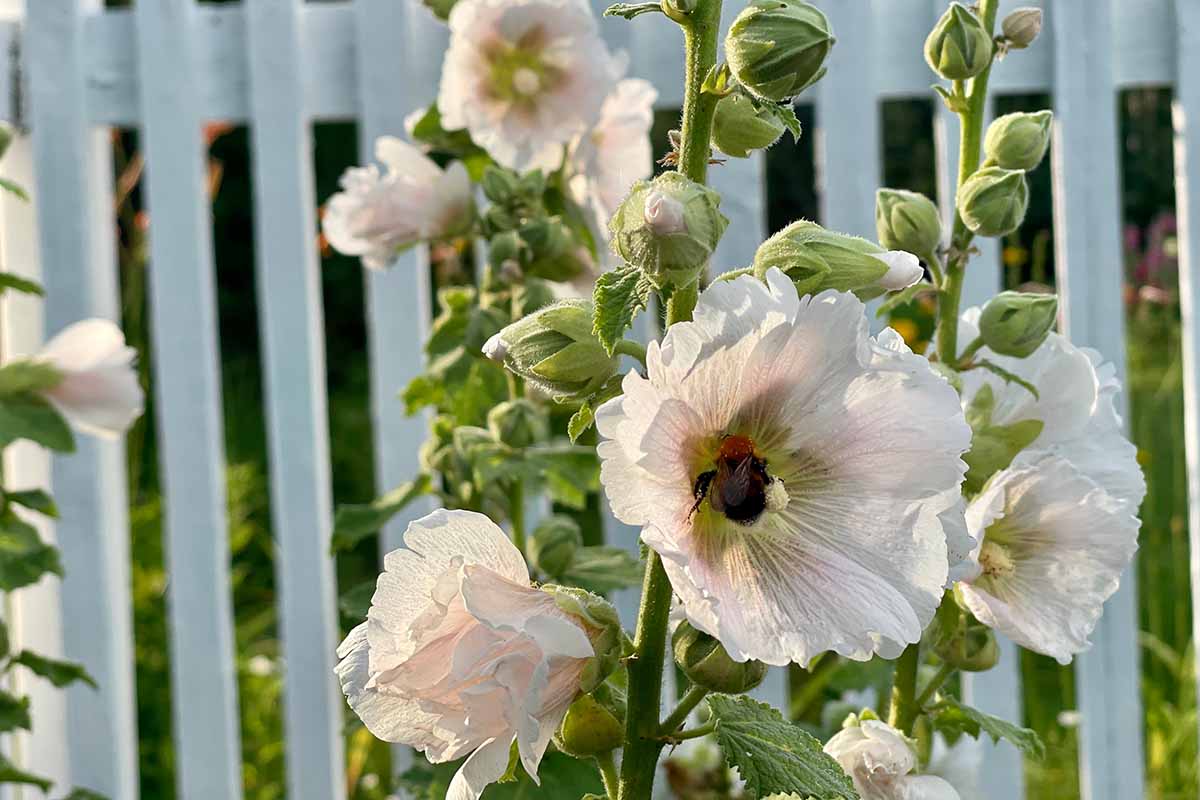
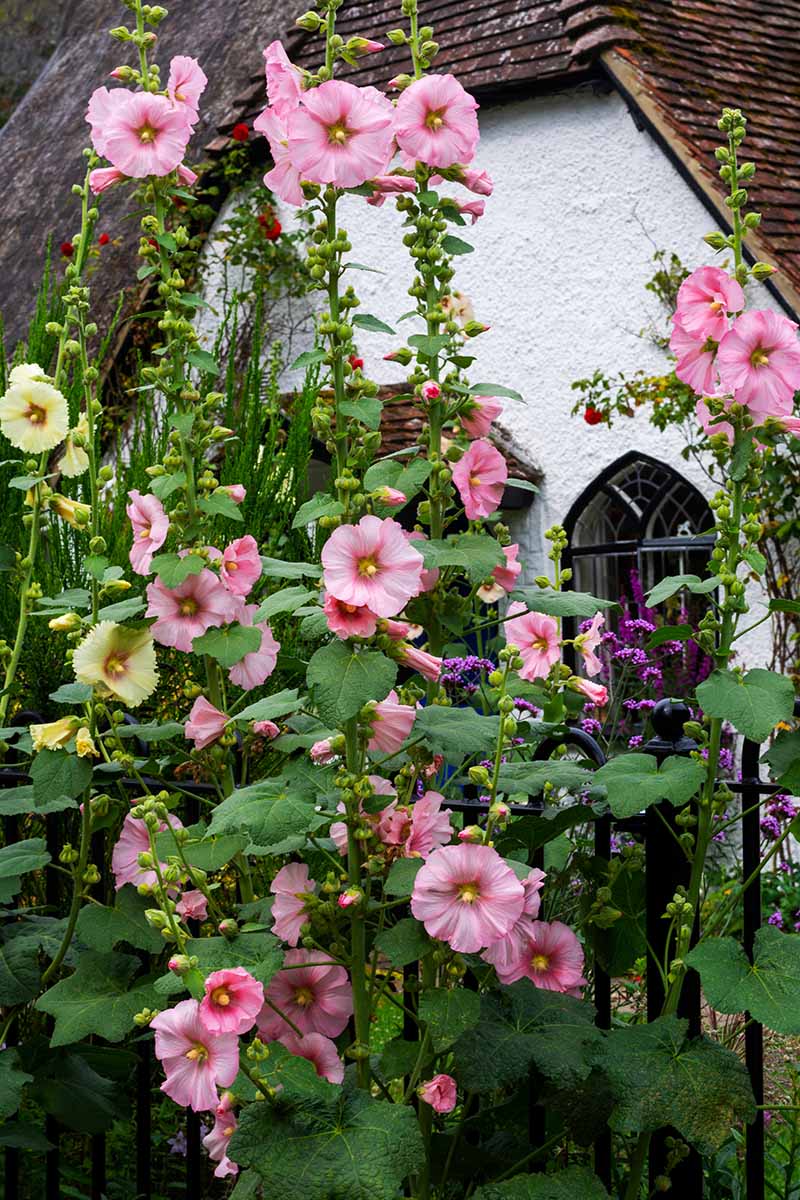
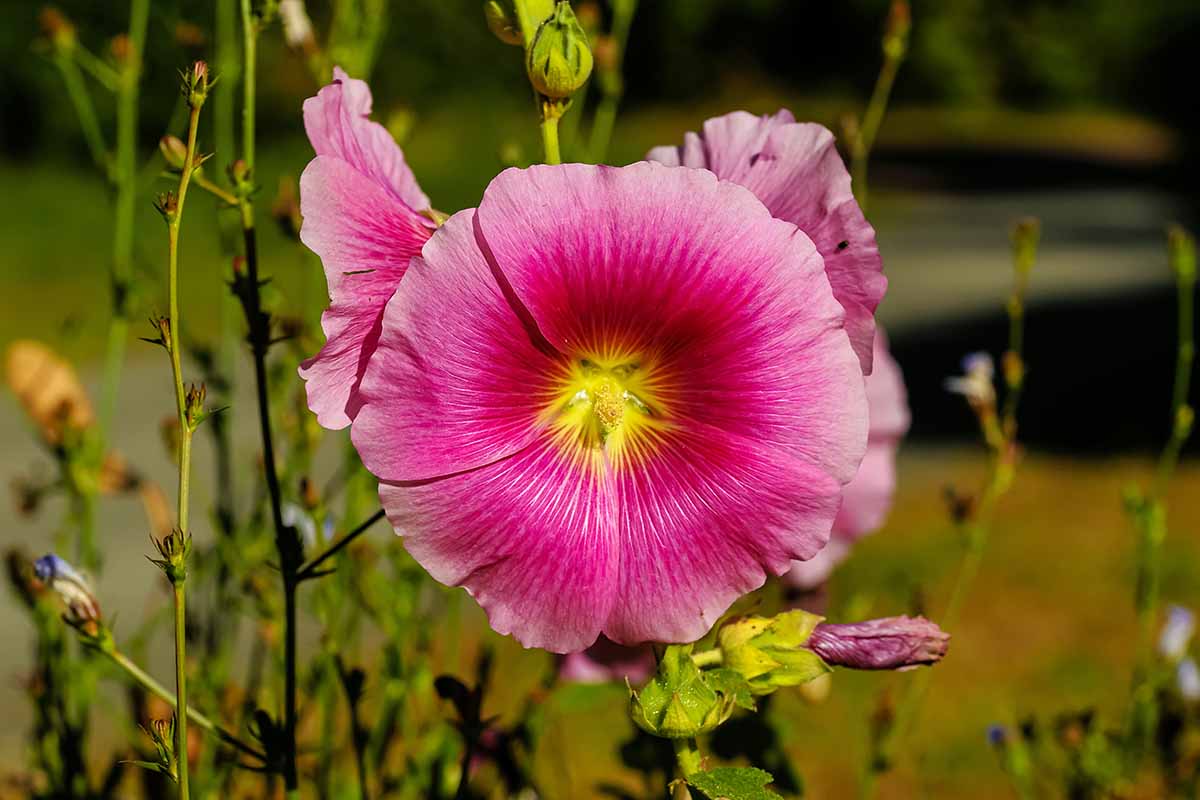
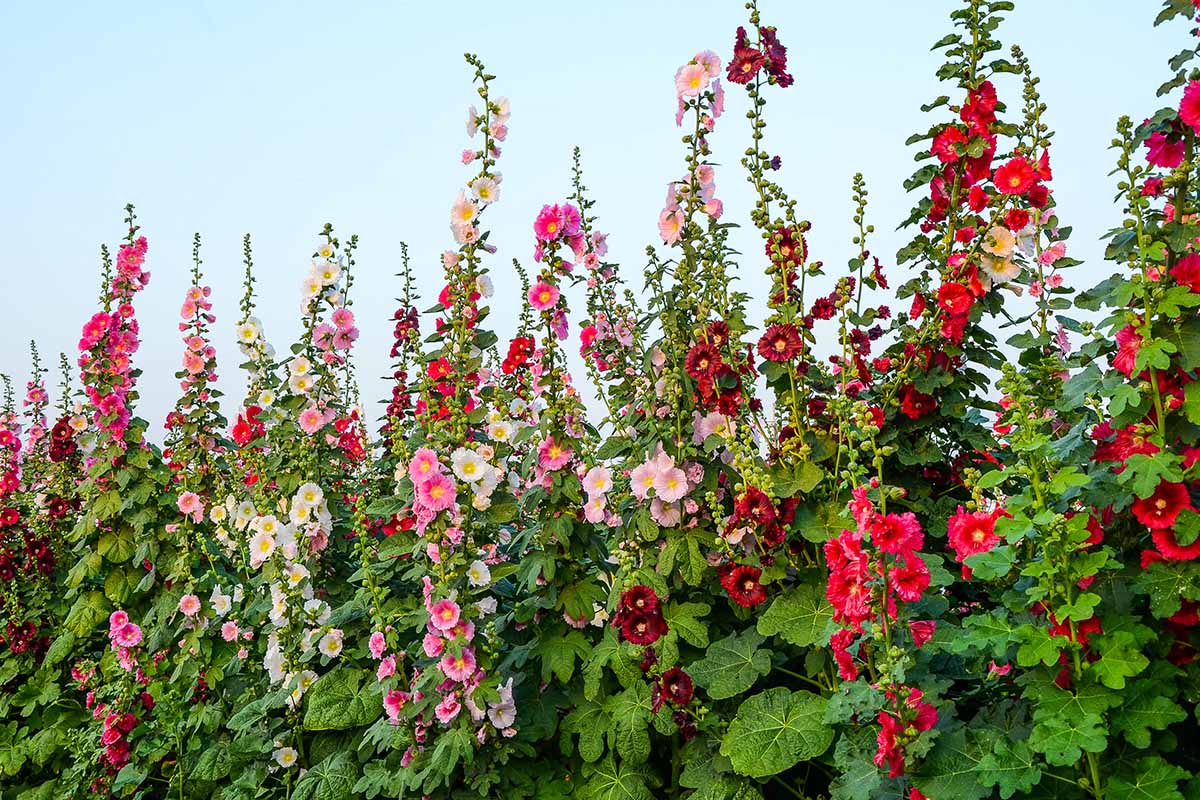
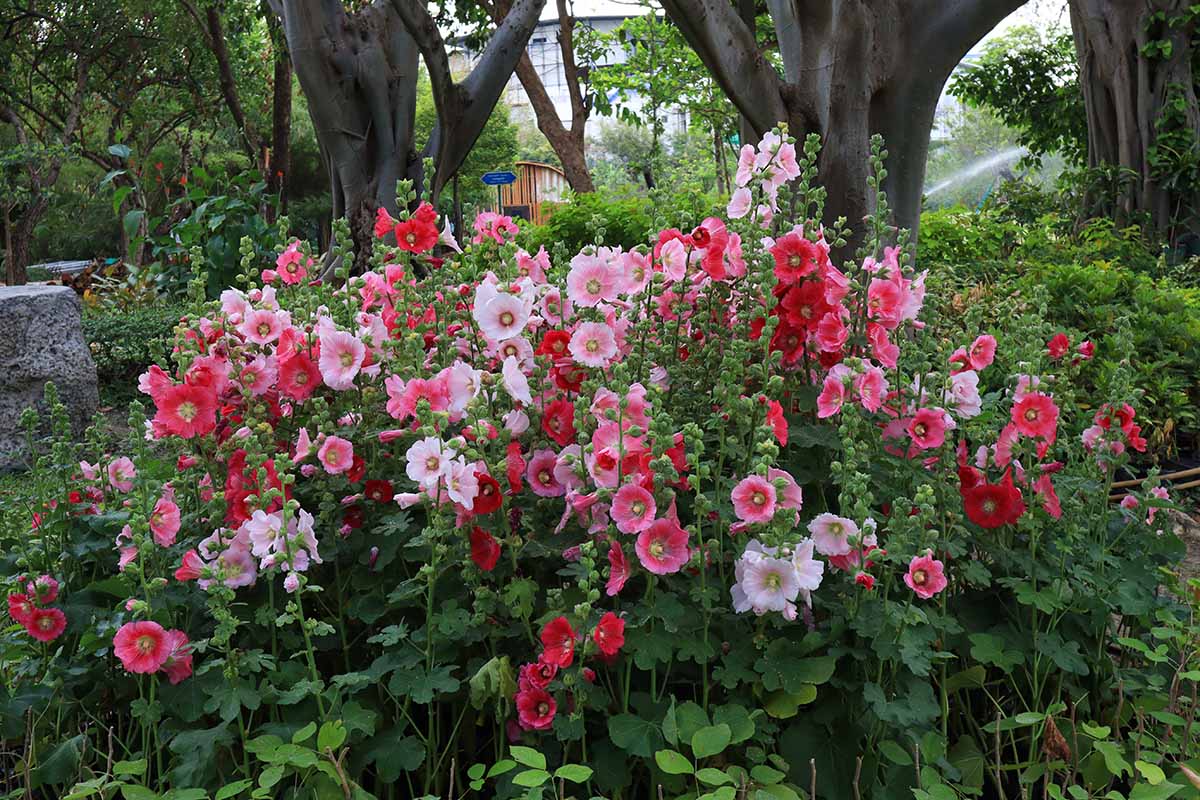
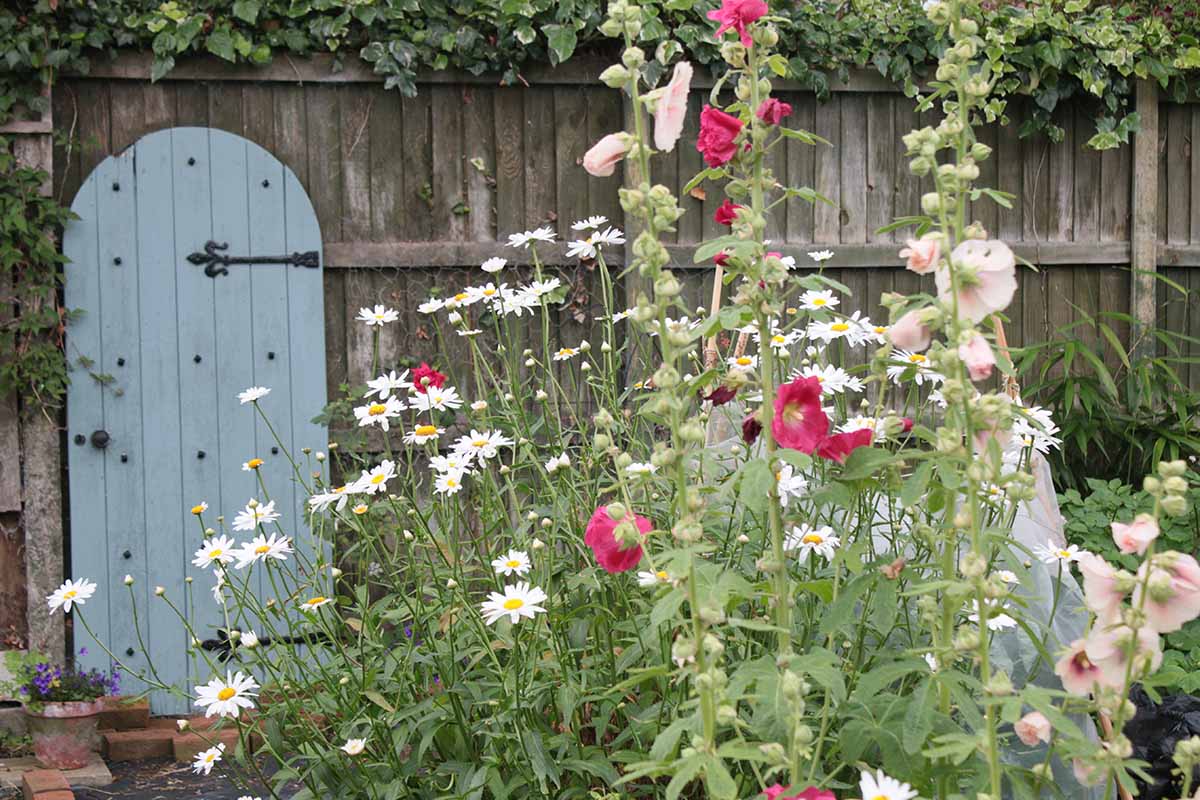
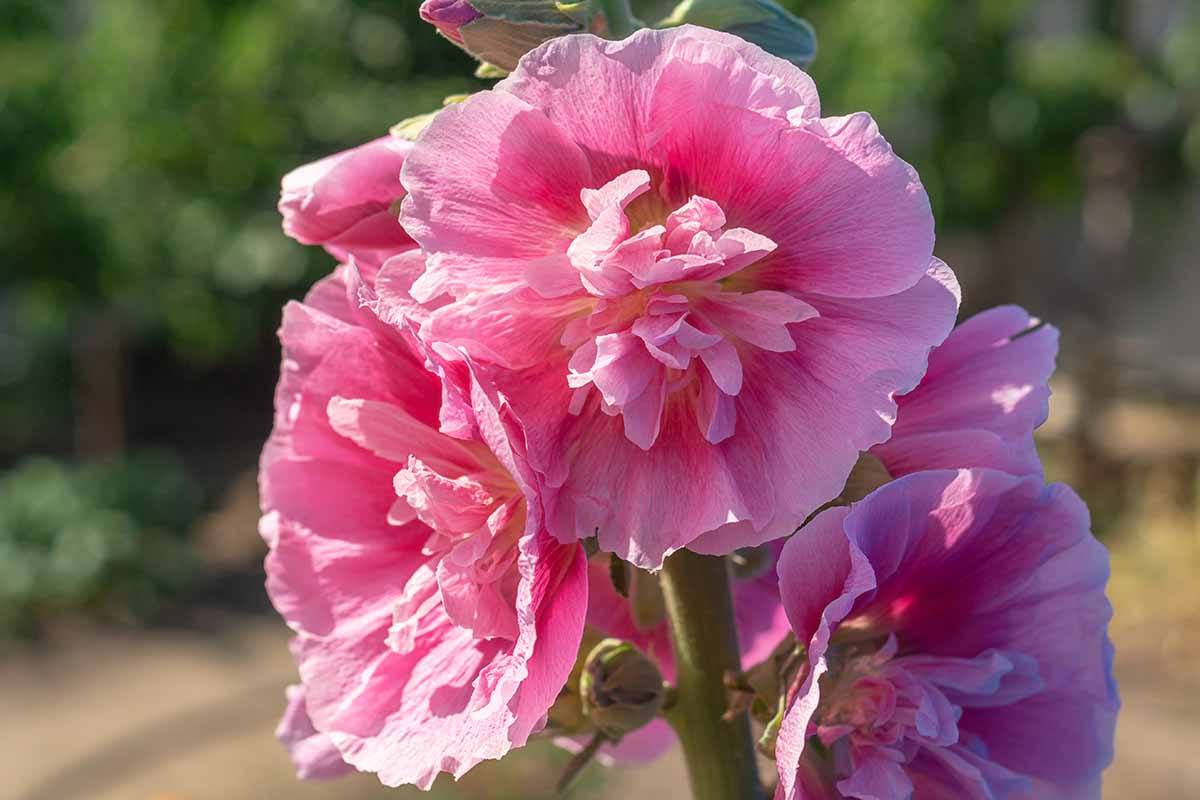
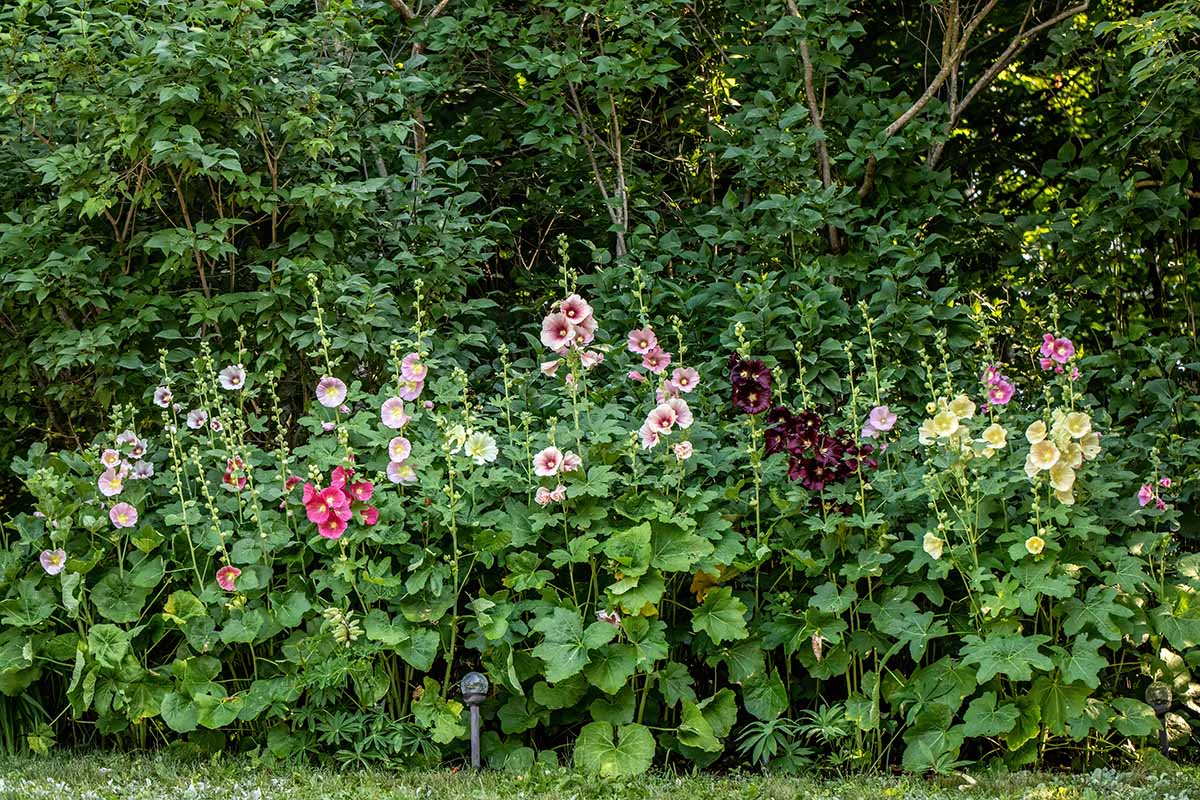
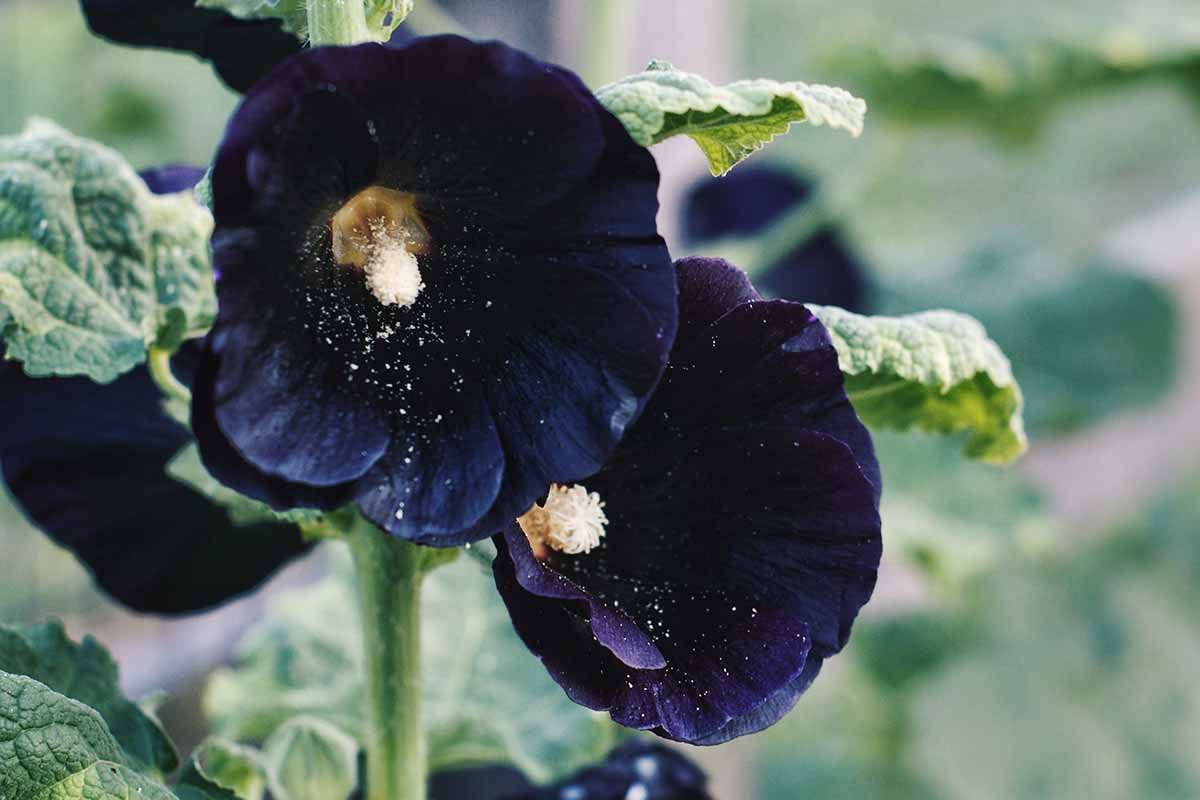
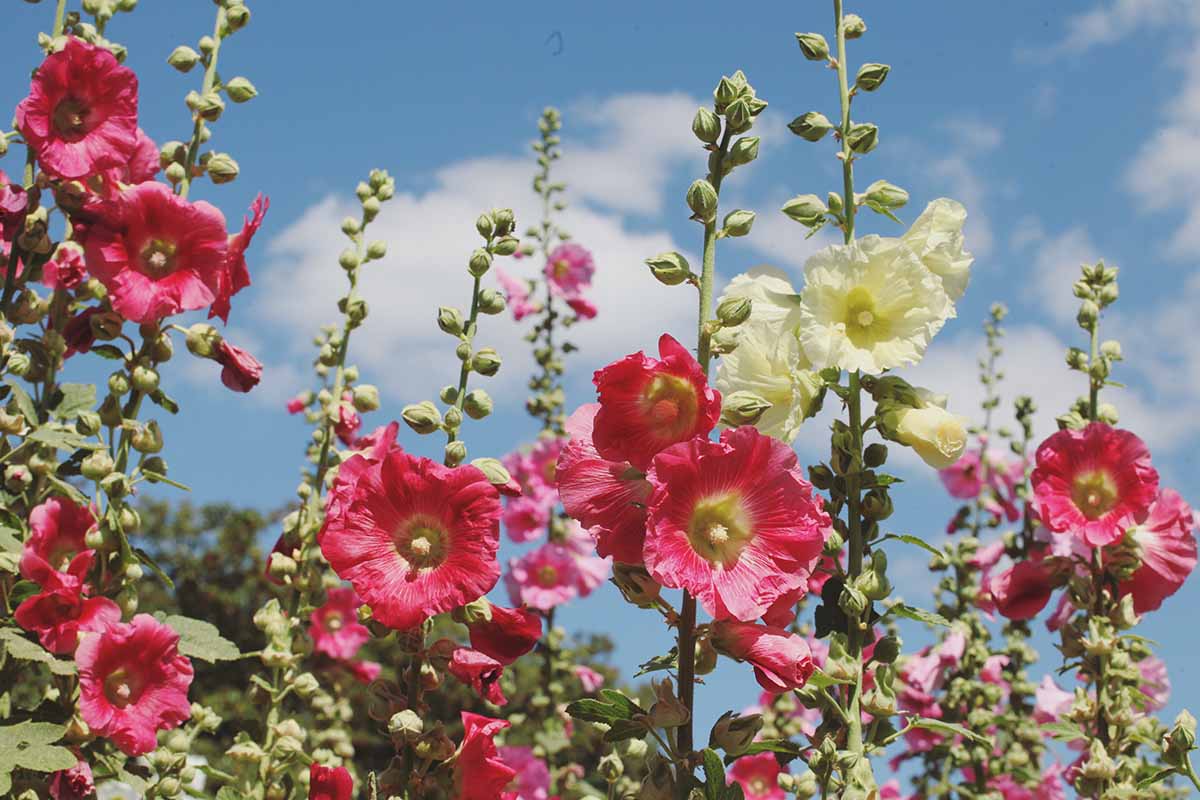
Growing and caring for A. rosea is easy. Their flowers create impressive displays, and they’re also exceptional pollinator plants. Stunning additions to the garden; they can reach nine feet tall when in flower! We link to vendors to help you find relevant products. If you buy from one of our links, we may earn a commission. The large flowers make for a perfect landing space for bumblebees, which adds to the whimsical character that hollyhocks bring to a garden. Hummingbirds and butterflies are also attracted to the blooms. A popular variety for botanical dyers is A. rosea var. nigra, also admired by Thomas Jefferson, who grew them at Monticello in the late 1700s. Mixing flower colors creates a cheerful palette, while selecting a specific color makes for an alluring and striking display. Interplanting them with various varieties of taller flowers is another way to create an eye-catching and impressive presentation in your garden. When selecting a variety of hollyhock, you’ll have two flower type options. It’s important to remember that if you want pollinators to enjoy this plant, choosing a variety with single rather than double blooms is best. Although appealing to us, the extra petals make it difficult for pollinators to access the flower’s nectar. As if they couldn’t be more magical, once you plant hollyhocks in your garden, they will reseed and continue to return every season. You can leave the seed pods on the flower stalks to self sow or collect and save them for the following season. Along with being an attractive selection to add to a flower garden, hollyhocks also offer fun crafting opportunities, from making fairy dolls to natural botanical dyeing. Learn about their history and how to plant and tend to them in your garden in this guide.
Cultivation and History
The common hollyhock, Alcea rosea, is a flowering biennial or short-lived perennial that belongs to the Malvaceae plant family. These plants have a long blooming season and can live for a few years in Zones 3 to 9 if you cut back the flower stalks after blooms fade. This species of hollyhock is said to be native to Asia. Its common name comes from the term “holy hoc” or “holy mallow,” referring to the land from whence they were first introduced to Europe, which was most likely somewhere in Palestine. By the mid-1500s, hollyhocks made their way to Europe through Britain, becoming popular thanks to the color they brought to stark landscapes. Today, they are a cottage garden staple. With the number of hollyhocks we see growing now, it’s hard to believe a fungus once threatened their cultivation. However, in 1869, a rust disease spread to Europe and was so destructive that people stopped growing them. By 1891, hollyhocks made their way back into gardens when horticulturists began developing improved varieties that were resistant to disease.
Propagation
Propagating hollyhocks from seed is easy. But if you want to get a head start, you can also purchase seedlings or potted nursery plants for transplanting.
From Seed
Growing hollyhocks from seed is the best way to propagate this plant. To encourage germination, soak the seeds overnight in warm water before sowing. Since the common hollyhock is a biennial, determining when to sow seeds in your climate is important. In warmer regions, you can sow seeds outdoors during late summer or early fall for flowers the following summer. Those in colder climates can start seeds outdoors after the last frost, with flowers appearing in the second year, during early summer. When planting outdoors, select a sunny location and space seeds two feet apart. You can sow them closer in case a few do not germinate, and plan to thin them later as needed. Gently press the seeds into the surface and lightly cover with soil. Keep the area moist and protected from direct sun and you should see seedlings emerge in 12 to 21 days. Once your hollyhock seeds have sprouted, it’s essential to give them at least one inch of water weekly in the absence of rain, to establish a robust root system. In colder climates, you can also opt to start seeds indoors to get a head start on the growing season and to ensure they have enough time to mature before colder temperatures arrive. Start your seeds six to eight weeks before the last frost if sowing indoors. Barely cover your seeds and keep them in a well-lit space while maintaining soil moisture and a soil temperature of 70 to 75°F. Seedlings should appear in 10 to 14 days. Keep them moist until transplanting time.
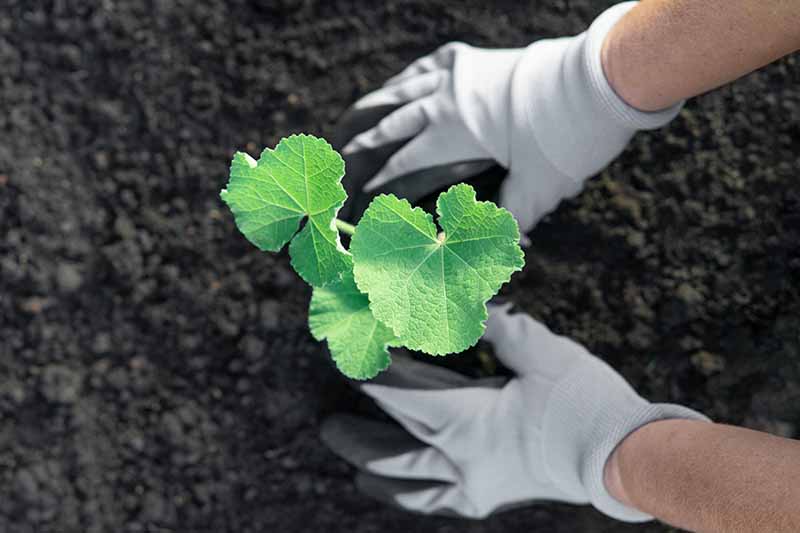
Transplanting
Early spring is the best time to transplant hollyhock seedlings or nursery starts, a few weeks after the last frost. Once seedlings have their true leaves, they are ready to be transplanted. If you grew your seedlings indoors or in a greenhouse, you will have to harden them off by taking them outside for a few hours every day for a week before transplanting, for increasing amounts of time each day. Established nursery plants can be transplanted in the fall once the weather cools down. For seedlings, nursery starts, and potted plants, dig a hole double the size of the root system in width and depth. Gently squeeze around the container to carefully loosen the soil and remove the plant. Backfill the soil level around the plant and to the top of the root ball, and provide a deep watering. New plantings may need protection from direct sunlight, which you can provide with a shade cloth.
How to Grow
Hollyhocks thrive in locations that receive full sun and in soil with excellent drainage that’s been amended with organic matter. Choosing a location along a wall or fence can help to provide support and protection from wind. Water at least once a week to encourage root development. As the plants mature, the soil should be kept moist. If it feels dry one inch below the surface, it’s time to water. Providing a thick layer of mulch around plants helps to maintain moisture. Be sure to spread it a couple of inches away from the stems to allow for proper airflow and discourage disease. Apply a light fertilizer or compost once you see substantial leaf growth.
Growing Tips
Apply a layer of mulch to retain moisture.Maintain soil moisture levels throughout the growing season and provide good drainage.Grow along a fence or wall in open and windy areas for extra support.
Pruning and Maintenance
As the plant grows, flower stalks can benefit from staking for support, especially to help reinforce them during windy weather. To encourage your plants to continue to grow and bloom for several years, you should deadhead the flowers. Some gardeners enjoy leaving the flowers in place to go to seed to feed birds, and so they can reseed on their own. If you find that a hollyhock has self-sown in an undesirable location, you can transplant volunteer seedlings after they have developed their true leaves but before the taproots grow significantly. Transplanting established hollyhocks in fall is best, if you need to move them to a new location. But note that you will run the risk of damaging the delicate taproot when you dig into the ground to uproot the plant. After their summer bloom, cut back all remaining flower stalks at the base and plan to transplant them on a day with temperatures above 50°F. Early morning or evening are good times to transplant to prevent heat stress or drying out. When the season cools down in mid to late fall, cut back foliage and flower stalks to the crown and add a few inches of mulch and compost over them to help them overwinter.
Cultivars to Select
The old-fashioned hollyhock look is still desired by many gardeners, even with the option to choose the more dramatic petals that “doubles” offer.
Managing Pests and Disease
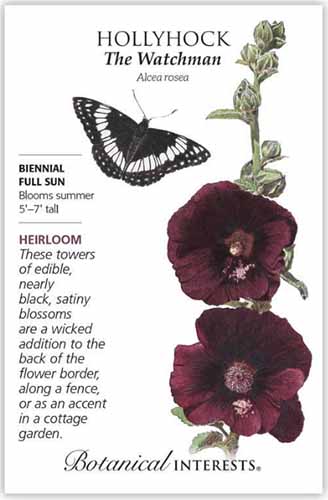
Common hollyhocks aren’t particularly vulnerable to pests or disease, but they can have some issues. There are many popular varieties of common hollyhocks to choose from. You can select a specific color or go with a variety that comes in a range of different hues like Country Romance Mix, a selection of true old-fashioned types in shades of rose, white, maroon, yellow, and pink. Country Romance Mix Plants in packs of four are available from Burpee. For something more dramatic, you could go with ‘The Watchman,’ a popular variety that has black flowers with deep maroon tones, or a two-toned purple-petaled hollyhock like ‘Creme de Cassis.’ Your choice of flower colors is vast! ‘The Watchman’ You can find ‘The Watchman’ seeds in 400 milligram packets available from Botanical Interests. ‘Halo Apricot’ is a variety that I’d love to include in my own garden because of the unique color of its flowers, which are peach to pink with cherry eyes. Also, apricot varieties are often only available as doubles, so it is nice to see a single option in such a dreamy shade. Here are a few of the main ones to look out for:
Pests
Hollyhocks are resilient but can experience pest damage to their leaves and flowers. This damage is mainly cosmetic and can be remedied by various methods. An ideal approach is to practice integrated pest management by growing a diverse ecosystem to attract beneficial insects. Scouting for pests and using cultural or physical controls can be helpful to maintain their gorgeous appearance. The most common pests that you may encounter include:
Aphids
These insects puncture stems while sucking nutrient-rich sap from the plant, and when they do, they can spread disease. Aphids may be lime green, red, black, or peach-colored, and they leave behind a sticky film known as honeydew that is appealing to ants, and can lead to sooty mold. Growing plants that attract ladybugs, green lacewings, and birds will help to keep aphid populations in check. You can also spray them off with the hose, or in the worst case scenario, you could apply a mild mixture of soap and water to deal with them. Read more about ridding the garden of aphids in our guide.
Earwigs
Earwigs like to hide in cool and moist places during the day, and at night they like to eat ornamentals like hollyhocks. So if you see holes in your leaves and it looks like an insect has been munching on them, this might indicate the presence of earwigs. Keeping populations under control is easy, especially with the tips provided in our guide to identifying and controlling earwigs. When dealing with large infestations, I have successfully used the wet newspaper and paper towel method that’s mentioned in this guide.
Japanese Beetles
You might catch a few of these large beetles enjoying the leaves or flowers of your plants. The easiest way to deal with them is to pick them off and place them in a closed container to get rid of them. If you have chickens, you can feed them the Japanese beetles or take them to a friend who has a flock and likes to give their birds treats. Learn more about Japanese beetles in our guide.
Slugs
These common garden pests come out at night when the weather is damp. They leave behind a slimy trail – and large holes in your leaves. Since they don’t tend to appear in large numbers, it’s easy to pick them off, but you must go out at night to catch them. I have successfully summoned many to a shallow tray filled with leftover beer. We share more tips for dealing with slugs in the garden here.
Spider Mites
The easiest way to tell if spider mites are attacking your plant is the sight of cotton-like webbing that causes leaves to curl. Tiny white dots on the leaves indicate where they were sucking on the plant juices.
Weevils
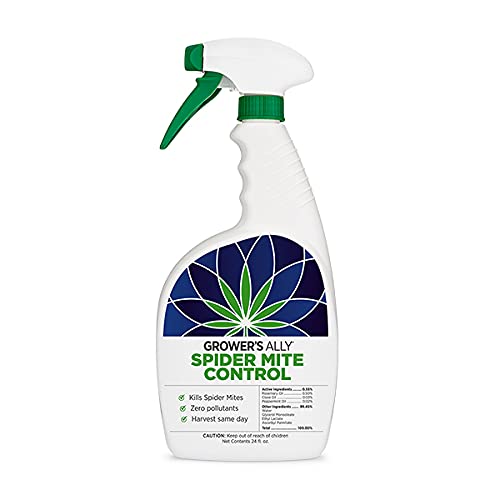
Rhopalapion longirostre has such a deep relationship with these plants that it’s commonly called the hollyhock weevil. These are tiny black beetles with orange-colored legs. At any stage of the plant’s growth, you can use a miticide spray like Grower’s Ally Spider Mite Control, which consists of a blend of botanical oils to rid your plant of these pests. Grower’s Ally Spider Mite Control Learn more about how to deal with spider mites in our guide. If you notice your hollyhock’s leaves turning to lace during June and July, this weevil might be the culprit! During the summer, these pests enjoy eating the leaves and buds, and the pests will gather on the buds, flowers, and seed pods. Female weevils lay their eggs inside the seed pods, where the larvae that hatch will feed. Luckily, adult weevils fall right off of a plant when shaken! To remove them, place a large piece of fabric under the plant, shake it, and then gather the pests to put them in soapy water that will kill them.
Disease
Hollyhocks aren’t susceptible to many diseases. However, there are several types of fungi that require particular attention and management since they may cause diseases that commonly affect these plants.
Alternaria Leaf Spot
This fungal ailment can sometimes be confused with rust, but you can tell the difference by the type of spots that you see. Alternaria does not leave raised rust-colored spots on the underside of the leaf. Instead, you’ll notice small angular-shaped spots that are grayish, and scattered all over the leaves. These will eventually kill the plant tissue, leaving holes behind. Removing the infected plant material as soon as you detect signs of this disease can help control its spread. Regular applications of an appropriate fungicide will assist in preventing the growth of Alternaria as well.
Anthracnose
High temperatures with increased humidity create an environment where this disease can develop and easily spread. Anthracnose fungi attack the roots, entire stems, leaves, and petioles. Because Anthracnose spreads quickly, it can be deadly to hollyhocks if it’s not identified in time. Black spots will develop on leaves and stems, or these can sometimes be tan or red. Next, the spots will begin to turn slimy and pink, and the stems will also develop black cankers. Leaves will then start to wilt, turn yellow, and eventually drop. To manage the spread of this disease, remove and destroy the infected parts of the plant and then treat with a fungicide according to package directions.
Powdery Mildew
Have you spotted an unsightly white powder on top of the leaves? That’s powdery mildew! This common fungal disease can start if a plant becomes stressed due to a lack of water, and high relative humidity adds to the possibility of infection. The fungus spreads through spores that thrive in dry environments. Because the fungal spores are spread easily through the air, it’s important to remove infected leaves as soon as you notice signs of this disease. The best way to avoid spreading spores while removing foliage affected by powdery mildew is to bring a trash bag with you to the infected plant so you can carefully place leaves in the bag and then quickly tie it up. Wear gloves and wash them after, or use disposable ones. And be sure to sanitize your pruning shears! You can read more about prevention methods and how to make your own homemade and organic remedies for powdery mildew in our guide.
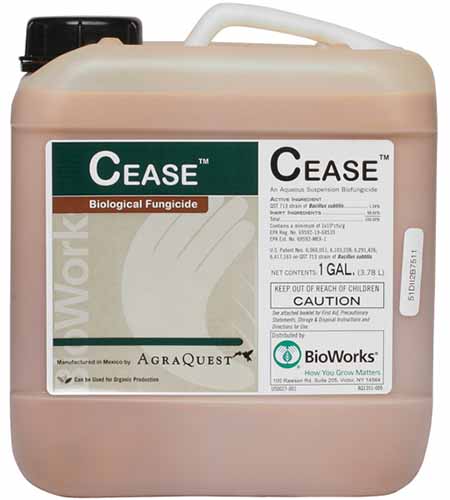
Rust
This fungal disease is very common in hollyhocks. It does not affect the blooms, but it does make the plant look a little weathered. One of the best ways to prevent rust is by watering at the soil level rather than spraying the leaves, since wet conditions encourage the spread of this disease. Like its common name indicates, this disease leaves behind yellow-colored spots on the leaf’s surface, and rust-colored raised spots on the underside of the leaves and along stalks. To manage the fungus, depending on how severe the spread is, you may be able to remove just the infected leaves. But it might be necessary to remove the entire plant in severe cases. The common hollyhock has been improved over time, but there are no varieties available currently that are guaranteed to be rust-resistant. They are stunning when placed in bouquets, and the flowers can also be made into cute flower fairy dolls! You could also spray your plants with a biofungicide like Bacillus subtilis to treat infections or for prevention. CEASE Biological Fungicide Sold as CEASE, it’s available at Arbico Organics. This biofungicide serves as an effective resistance management method, helping to control the spread of invading pathogens, and it is safe for pollinators.
Best Uses
Hollyhocks are pollinator-friendly plants that can help to complete your garden space. They make for a fun conversation piece and crafting fun for kids and adults. I’ve had botanical dyers reach out to ask me if I could share some of my A. rosea var. nigra flowers with them to use. The petals are a dark maroon color that is very close to black, and when simmered in a pot, they release a natural dye that can be used to create beautiful shades of blue, gray, and purple. After reading about these stunning flowers, are you inspired to add some cottage-garden ambiance to your outdoor space? Growing them in your garden is simple, and it provides an excellent experience for all gardeners. The big, gorgeous blooms create mesmerizing displays while attracting diverse pollinators. As a gardener who enjoys saving seeds, I appreciate how much seed one plant can produce and enjoy saving and sharing these with friends. In addition, sharing seeds is a great way to connect and discuss gardening with your community. Thanks for reading! Please share your thoughts and questions in the comments section below! Looking for even more flowering plants that will help you to transform your space into the pollinator-friendly cottage garden of your dreams? Check out these guides next:
Promoting Pollination by Design: How to Attract PollinatorsBirds, Bees, and Beauty: Tips for Growing a Native Wildflower Landscape at Home17 Temperate Flowering Perennials That Will Grow Almost Anywhere