Okay, let’s be honest: you might as well call me Scrooge McGrinch. The only parts of the holiday season I find joyful are watching A Charlie Brown Christmas and lacing my coffee with bourbon. For better or for worse, the gardening and landscaping company where I work does a tremendous amount of Christmas decorating for our clients. We wrap garlands, hang wreaths, and set up lights on indoor and outdoor trees. It’s tough to spend forty hours a week focused on the holidays, but I manage to find a few perks in it all.
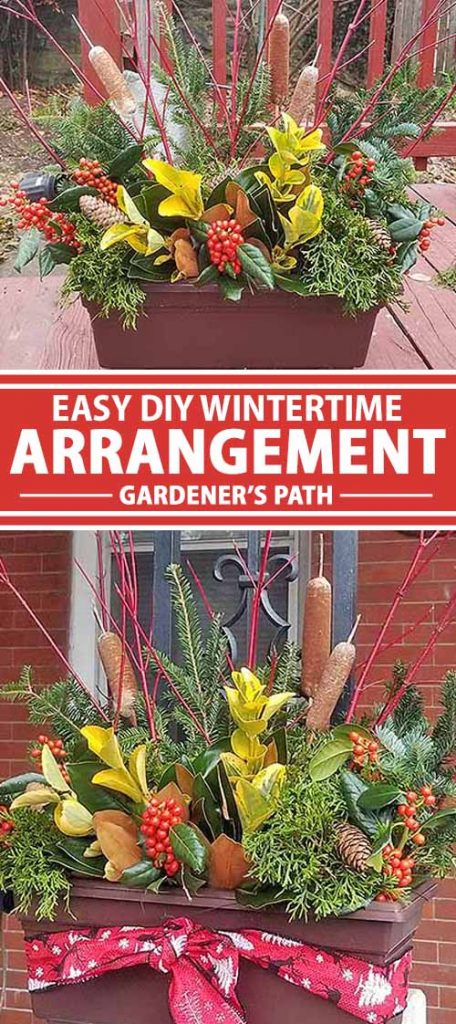
First and foremost, I have found satisfaction in designing and building winter holiday-themed containers and arrangements. It’s an interesting craft; we put together a smattering of fresh-cut greens, branches, and other decorations to create a unique display piece. Some clients have us decorate their indoor mantels and windowsills while others prefer we add holiday gaiety to their existing outdoor planters. The results are usually gorgeous and we receive compliment after compliment. But here’s a secret that I’m going to share with the readers of Gardener’s Path: These containers are super easy to put together yourself. Better yet, they can cost you next to nothing. I put together a container that’s now on my front porch. Everything you see in it (and in the how-to you’ll find below) was cut from shrubs and trees in my own backyard, from my neighbor’s yard, or from a local park. The only items I purchased were the foam blocks used to hold everything in place. Hang onto your hats and get ready, because we’re going to get right into it… after a few words on safety and general advice.
Safety First, Young Grasshopper
Like most gardening projects, designing your own winter planter requires the use of tools and your hands. I recommend you use gloves to protect your hands and fingers. I’m stubborn and resent wearing gloves, but I have the scars, bruises, and other wounds to prove why this isn’t a good idea. Pine cones and berries can be sticky, and natural foliage tends to shed. Plan to craft your project outdoors, or cover your work area with a tarp, plastic tablecloth, or large trash bag that you can throw away when you’re done. As an added bonus, this makes cleanup a lot easier! In addition to a pair of gloves, use a trusty pair of pruners for cutting the greens and other plant material. Make sure your tools are sharp, clean, and in good working order before using them. An entirely optional additional piece of safety gear is a pair of glasses. Accidents happen, and you always want to take care of yourself, just in case. The plants I use in this how-to are safe to handle, but double check your own selections and remember to ID mystery plants before using them in any capacity.
Be Always Courteous
About half of the material I used in this arrangement was from my own backyard. The rest was procured from parks and neighbors’ gardens. If you aren’t friends with your neighbors already, this is a great way to bridge the gap. Knock on their door and let them know about your project. Express your admiration for their winterberry, common holly, or what-have-you in their yard and ask if you can harvest a few carefully selected branches. I’ve yet to meet another gardener who jealously hoarded their plants. Heck, if anything, they’ll be flattered and ask to peruse your own plants for similar future projects. Never harvest your materials blindly. Cut material responsibly and with the health of the plant in mind. Alternatively, you may purchase your materials from a reputable garden center. Many retail locations that sell Christmas trees have a surplus of cut boughs that you can use as filler greens for your project, like I did with mine.
Be Creative and Able to Adapt
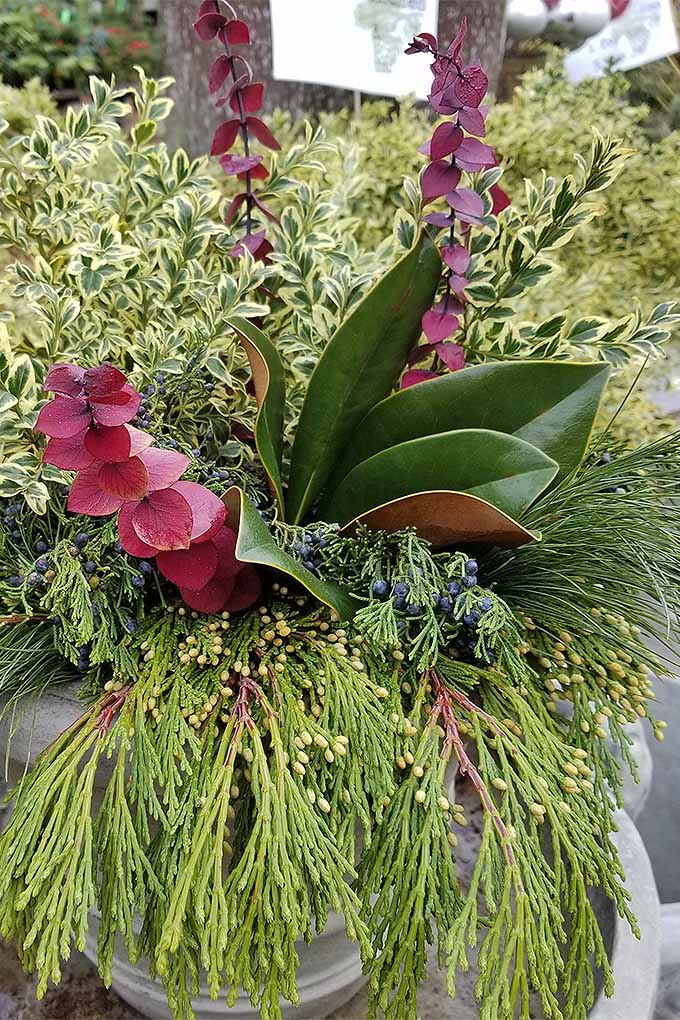
I’ve shared the finished product with a few people and most of the comments say, “Cattails?! That doesn’t fit at all, and they look like corn dogs sticking out of there!” Well, I agree, sir, they do look like corn dogs. But I happen to like the look and it reflects my predilection for a country-fried decor. Your design should be attractive and appealing, but what fun is it if it blends in with every other container idea you see? Cookie cutters work great for cookies, but a gardening project like this should be an extension of your own taste. You may well live in a region where some of these plants do not grow, or perhaps you simply don’t like southern magnolia and the Nellie Stevens holly. That’s okay. The purpose of this arrangement how-to is to show you the basic construction of your own winter decoration. The fine points are up to you! Seriously, I can’t understate the importance of putting your own spin on your container. Another excellent article discusses using warmer-weather plants and garden materials in your containers. Give it a read and see that with the exception of a few basics, the sky’s the limit when it comes to your own design work. If you are putting together multiple containers and want them to match, then I recommend working systematically. Place your “filler greens” first and complete each step one at a time in each container. This way you can more effectively match your containers together and assess your supplies. And now, without further ado…
Constructing Your Holiday Planter
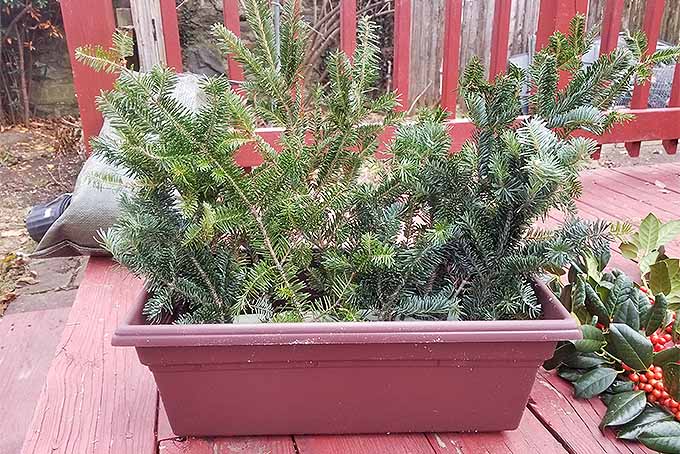
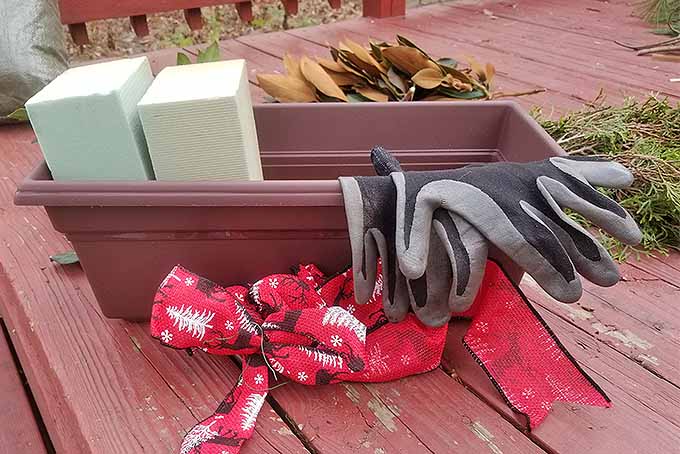
For this project, you will need a few basic pieces of equipment. I used a small, rectangular planter box for mine. You can use literally anything for your container: an otherwise empty outdoor container, an indoor-only item, an old wooden box you’ve been searching for a use for, or a glass vase. Collect your supplies and lay them out for easy access. For this project I used the following (in order of quantity, from most to least): It is important to note that the foam is very light and your container will likely be top heavy. Solve this dilemma by placing a few rocks and stones in the bottom of your planter to weigh it down. Decorative glass marbles also give an attractive look in translucent containers. And remember… your design is supposed to be a display of unity and balance. Nothing should be too overpowering. The whole shebang should look natural, as if it wasn’t designed and simply fell into place of its own accord. That means it isn’t perfect!
Frasier Fir greens collected from a shop’s Christmas tree trimmings Emerald Giant Arborvitae cuttings collected from a neighbor’s yard Southern Magnolia leaves and tips pruned from a tree in my backyard Redtwig Dogwood branches carefully culled from a huge specimen in a local park Berry-producing branches from a Nellie Stevens holly in the front yard of my employer’s home Golden Euonymus from a shrub in my backyard Cattails from a pond at a local park Norway Spruce cones from a client’s backyard
Keep in mind that greens and foliage should not be gathered in protected areas such as nature preserves and state parks that have enacted restrictions against taking specimens home, sometimes with a hefty fine attached. Not sure what types of conifer cones you have? Read my handy guide to conifer identification.
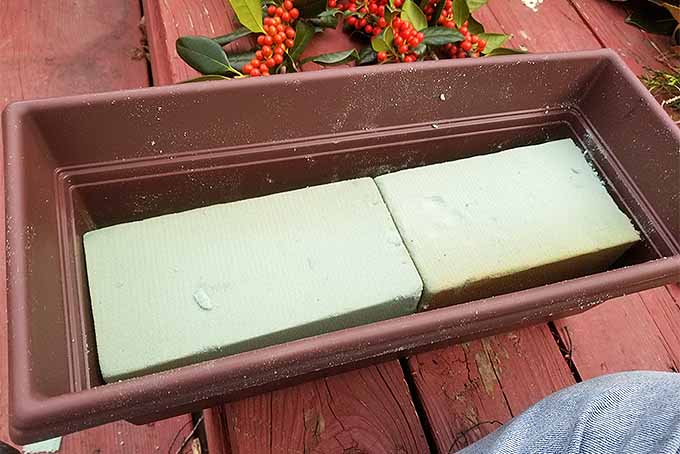
Step 1 – Prepare Florist’s Foam
Cut the foam blocks to size and cram them into your container. If you’re using a potting mix or some other sort of planter filler, disregard this step. The blocks do not need to fit perfectly. I filled the open space with some potting mix and stones to weigh the container down.
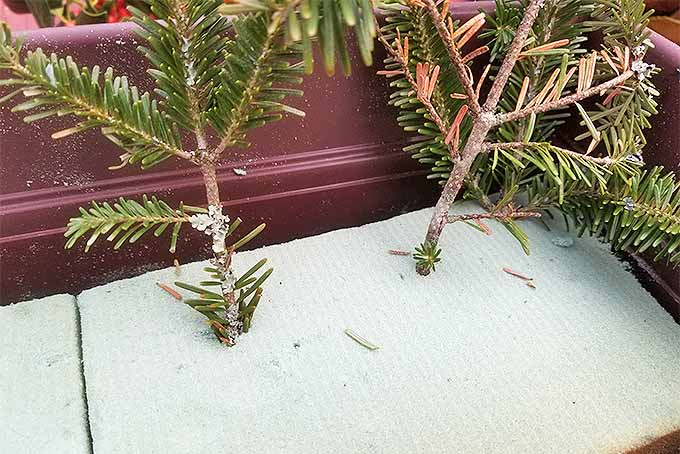
Step 2 – Place Filler
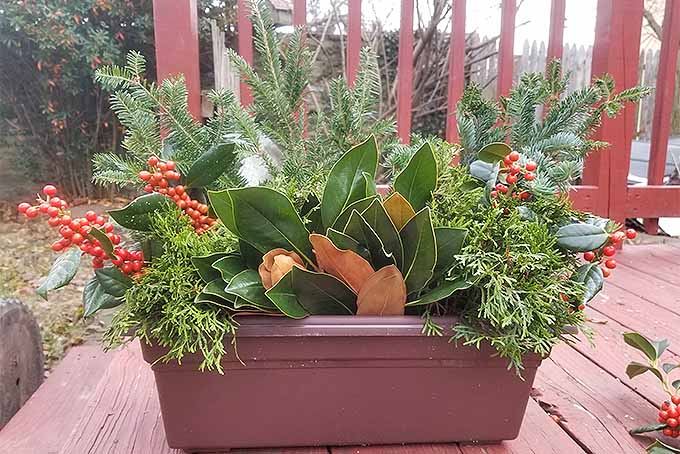
Place your filler greens. For this container I used Frasier fir greens as a base background to the whole affair. Cut the branches at a 45-degree angle to make it easier to punch through the foam blocks or potting mix. These initial greens are meant to serve as a background for your container and don’t need to be meticulously selected and arranged. Place them in unspecific patterns so that your design has a full background of green foliage. This should be taller than all of the rest of the greens in the container so that it can provide a good backdrop for everything else.
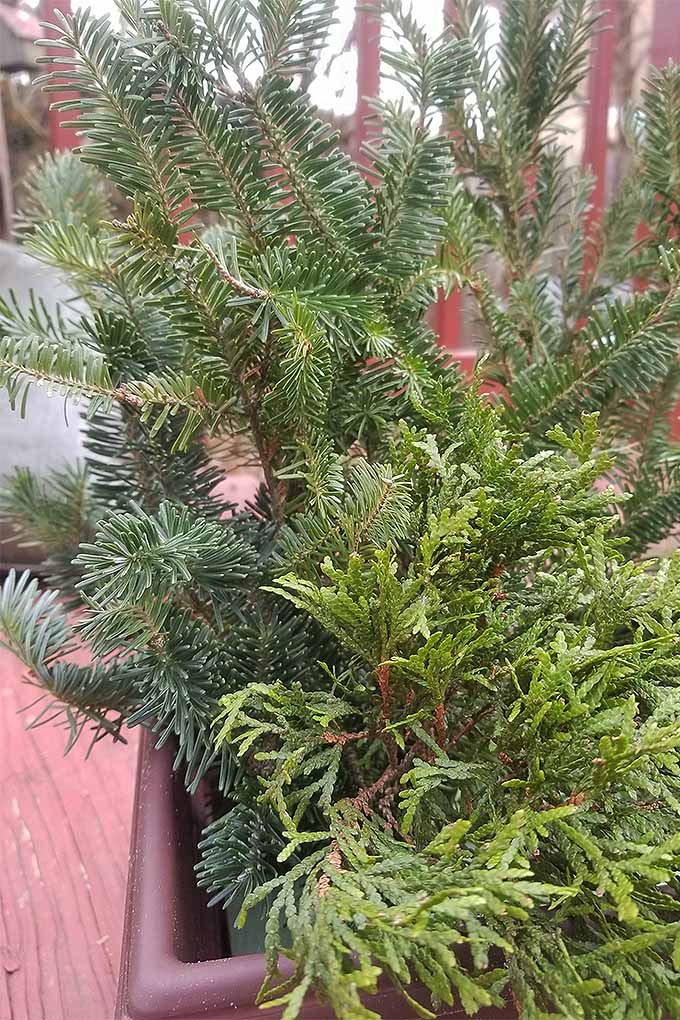
Step 3 – Fill the Middle
Fill in the middle ground with your secondary filler greens. In this example I utilized a few arborvitae clippings to serve as a bushy filler. I used almost as much arborvitae as I used Frasier fir. The trick to this step is to add a bit of variety to both the color and texture of the container. After all, these two greens make up the bulk of what’s in the design. These should be placed at a middle tier of height in the container. This layer of greens could spill out over the edge of the container to add a flowing, fluid look to the design. Try to leave a gap of open space in the front and center area of your container (see Step 5).
Step 4 – Colorful Additions
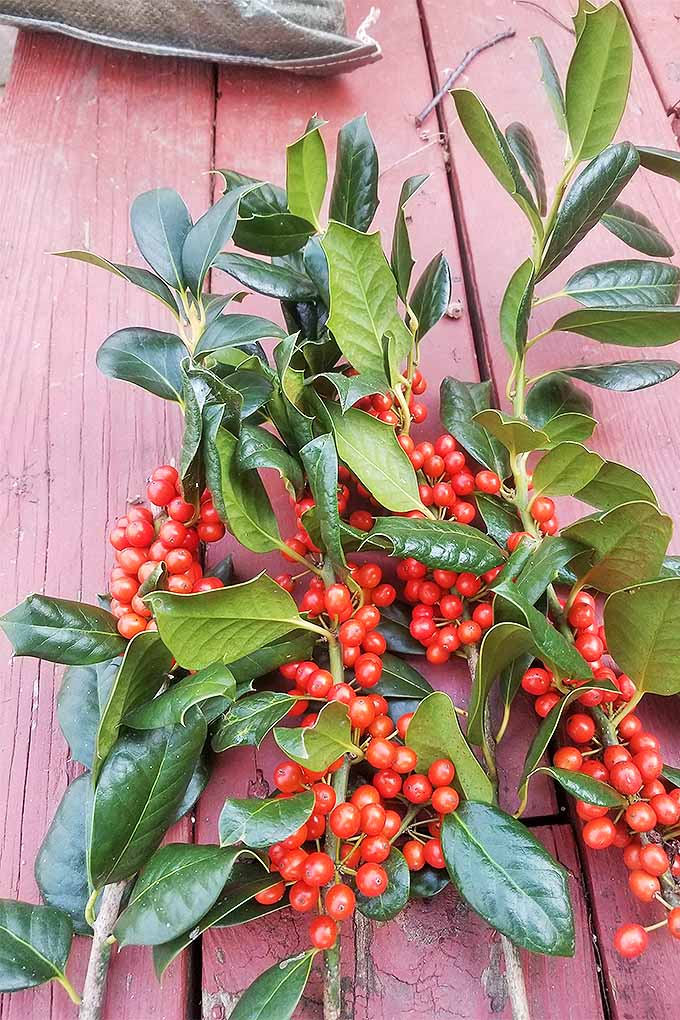
Time to add some color! It’s tempting to go overboard here, but remember that sometimes less is more, and just a little bit is enough. Most of this container will be evergreen-based, so a little bit of color adds a lot and shouldn’t be abused. I used exactly four sprigs of holly berries to distribute color evenly around the container. The branches and leaves continued growing past the berries so I snipped them off, leaving the berries in full effect. I fully expect these to be picked off and eaten by birds in the next few weeks. The berries on a Nellie Stevens tend to be a bit more orange than red. If I had a choice, I would have used winterberry instead.
Step 5 – Greens Up Front
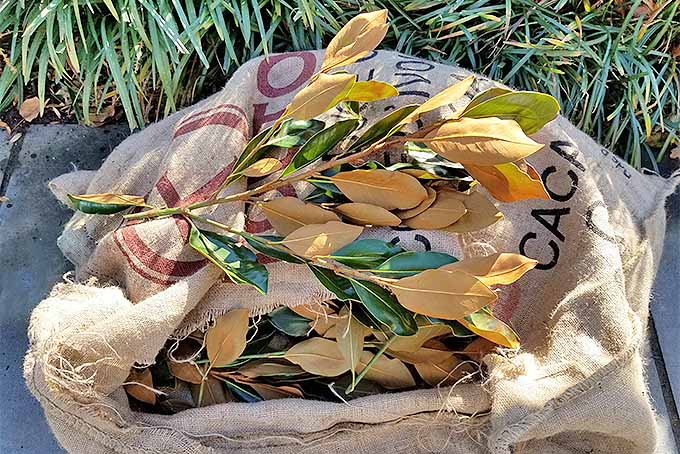
Insert and arrange the “front and center” greens that will be featured at the front of your arrangement. In this project, I used the tips of a southern magnolia; they tend to maintain their green luster for a long time and the velvety brown underside of each leaf is a nice complement to the green that dominates the bulk of this design.
I stuck these branches in at sharp angles and manipulated the leaves to look as if they were spilling over the sides of the container. At this point you should be running out of room in your design to add new material. That’s okay, because the final steps require only a few accents.
Step 6 – Add Accents
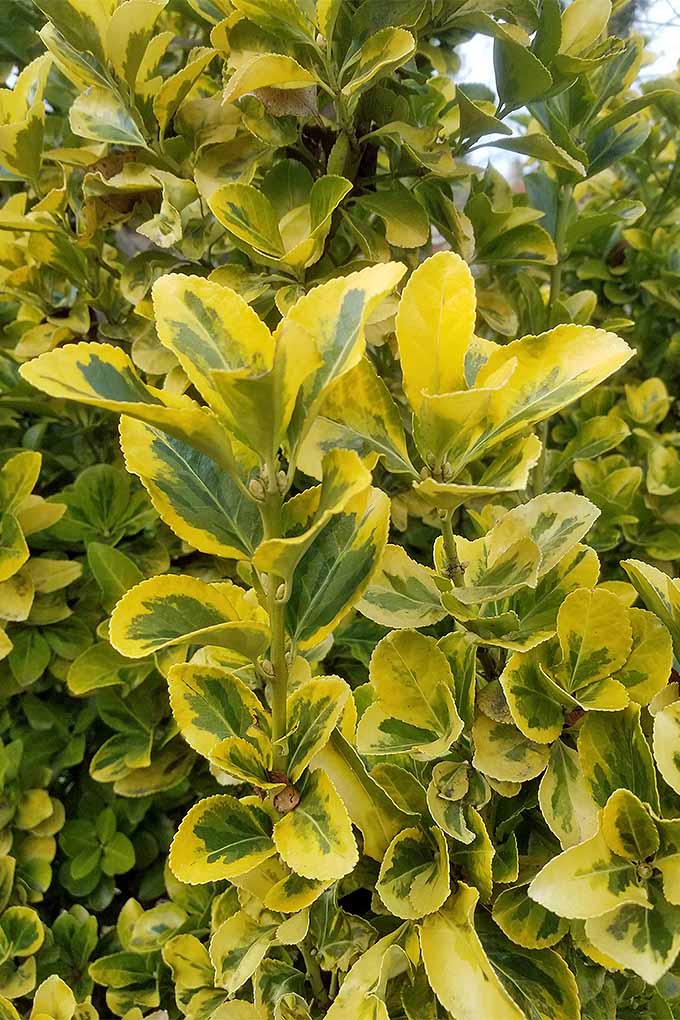
I’m a sucker for a nice yellow-and-gold hue, so I threw in the new growth from a golden euonymus as an accent to contrast nicely with all of the green going on. Like in Step 4, the trick here is to add just a bit of color so that it grabs more attention in opposition to the sea of green.
I only used four branches, and I removed the bottom leaves from the stems before inserting them into the foam blocks. This bright, bold punch of color should be front-and-center and shouldn’t reach above the background row of greens. Other options to use here are a variegated boxwood, a blue-green splash of eucalyptus, or some Gold Thread cypress. Or, you know, whatever color you like to see – this is your planter, after all!
Step 7 – Focus on Earth Tones
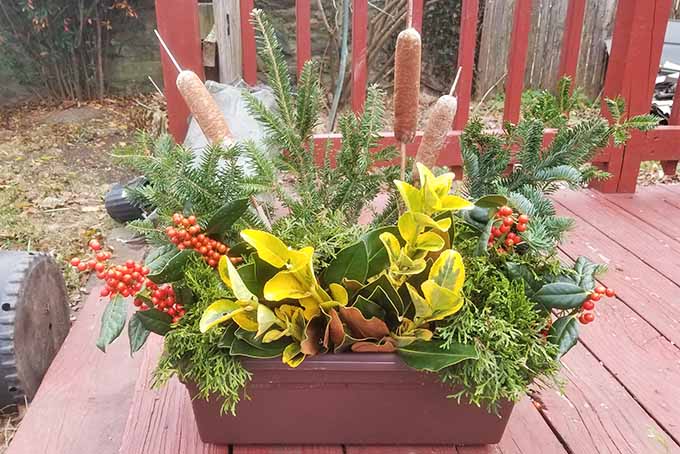
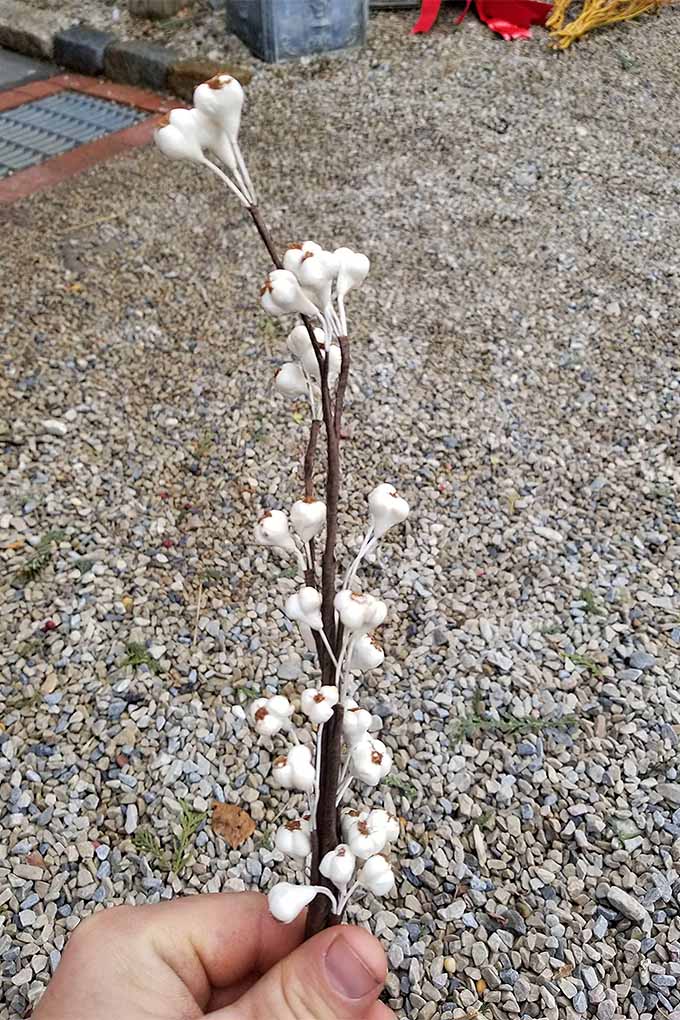
Remember that nice touch of earthy brown provided by the magnolia leaves? We’re going to couple that with a few other shades of brown and add some accents. First I placed three cattails in the back of the display. I love the color of these things and have always found them incredibly interesting. As the season wanes I expect to see them shedding seeds in a puffy display.
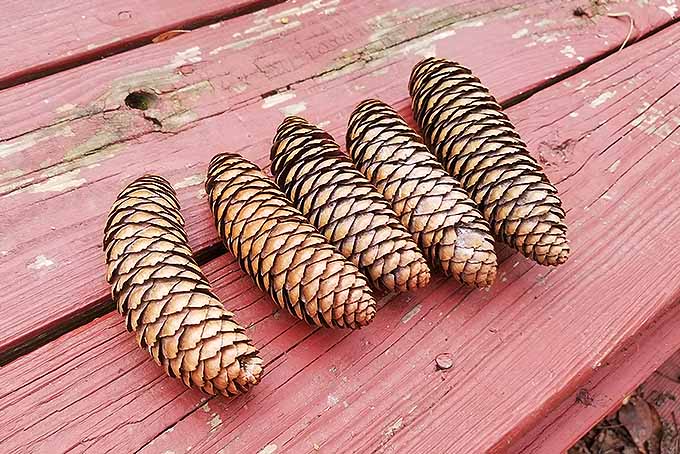
The trick here is to complement the subtle brown notes of the magnolia leaves, and throw a new shape and texture into the mix. Sure, they look like corn dogs to some but that’s alright! Additionally I added three Norway Spruce cones. These break up some of the smooth green elements and complement the shape of the cattails. I can’t overemphasize the importance of adding a range of colors as well as textures for varied interest, and to really make your arrangements pop.
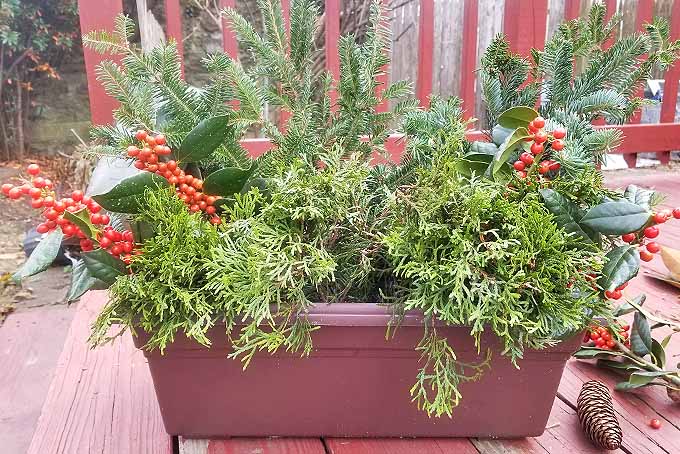
Step 8 – Finish with Height (or A Frilly Garnish)
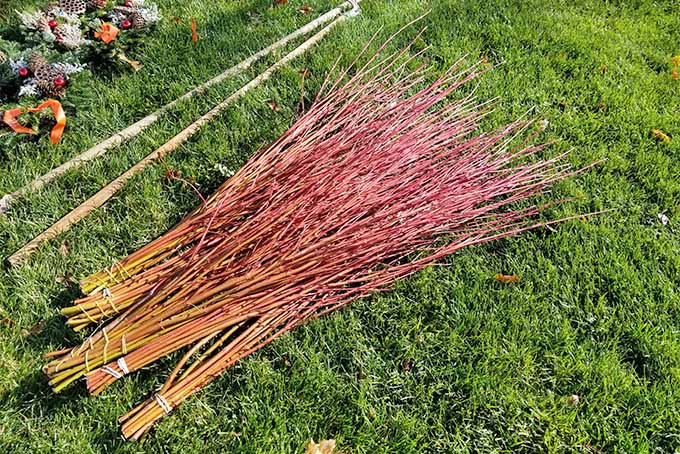
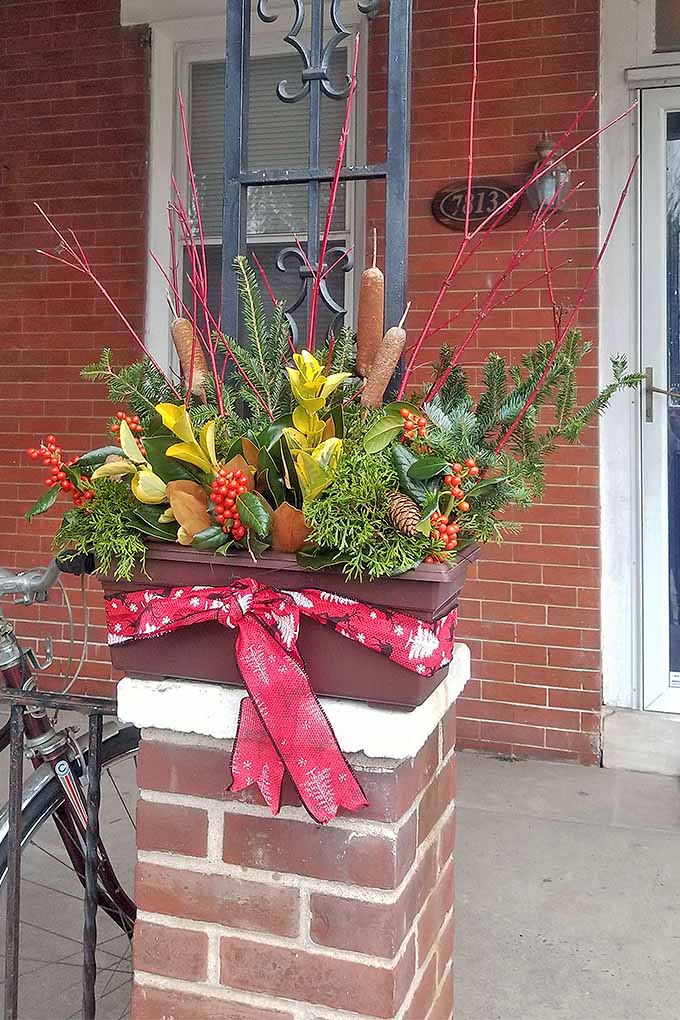
Ah, the final stage: adding the Redtwig dogwood. These branches should be placed in a radial pattern, starting at about 10 o’clock and finishing through to 2 o’clock. A little bit is enough; these branches should complement the design without overpowering it. They add some height and delicate structure to the whole container, bringing your focus in and drawing it towards the other elements. Think of this step as the frilled edges, that last dash of subtle icing, or the cherry in a cocktail. Speaking of which, if you’re in the mood for another holiday project and the kitchen is calling to you, head on over to our sister site Foodal to check out their guides to decorating holiday cookies like a pro, and making homemade maraschino cherries.
Now Display That Thing!
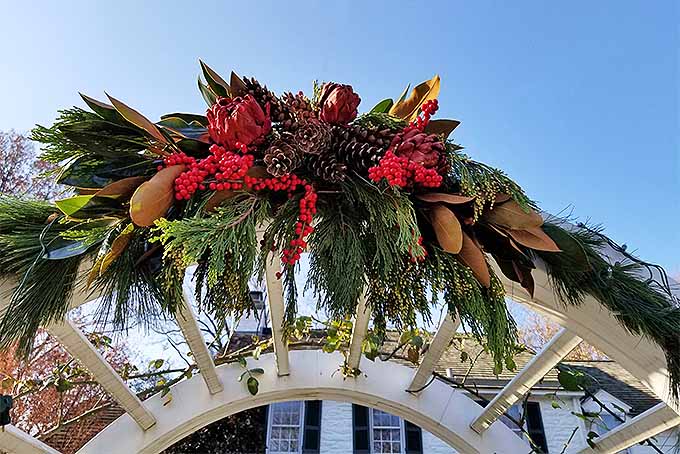
Mega Swags
With a little bit of that florist’s wire and some patience, you too can wire together a nice design of your own using holiday favorites. The cooler air outside should help to preserve your arrangement’s integrity on the front stoop, deck, or patio. I recommend using a product like Wilt-Pruf protective coating to maximize the life of your creation. These concoctions are called “anti-desiccants” and will lock in the moisture of your greens and preserve them far longer than they might if left to naturally decay. This one fro Wilt-Pruf is available as a ready-to-use spray, or a concentrate. Remember that if you used foam blocks in your container it will be top-heavy. When I placed my design, I weighted the container down with rocks and stones and tied the container safely in place with florist’s wire. First, understand that the material you’re using is going to brown, wilt, and lose its freshness. It’s a process you can’t prevent, but you can work around it. To maintain freshness in your greens, lightly mist them every few days during warm or dry weather (and in warm and dry conditions, which you will find indoors in the wintertime). Additionally, it can be helpful to keep outdoor containers protected from very wet or snowy conditions. These babies just won’t look the same after a night spent out in wind-blown sleet or an ice storm. Ultimately it’s a losing battle, and your wonderful creation will be more brown and crispy than green and festive after awhile. Some people, myself included, enjoy that look of naturally fading material; others are inclined to replace the crispified (is that a word? It is now!) greens with fresh stuff from whatever sources they have. The choice is up to you.
This stuff is great; I use it to suspend bird feeders, support any outdoor project, and to tie together greens and branches into door swags. It is available in pre-cut lengths as well as spools.
Other Ideas
The plants you see in this design are a reflection of me being an oddball, but also of my upbringing in field and stream (… not the magazine). Your container should speak to you more than anybody else. With that in mind, here are a few additional ideas you could experiment with:
Waste Not, Want Not
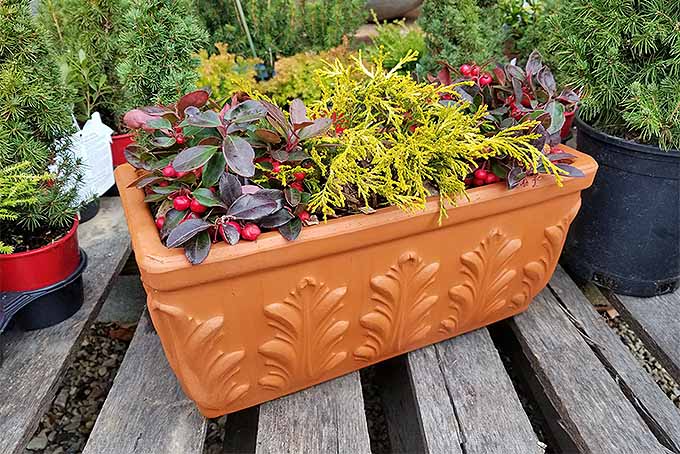
Another version of collecting and harvesting your own fresh greens is to purchase live plants and create winter arrangements with them. This container uses two Gaultheria and a variety of goldthread cypress. Evergreen shrubs like mugo pine and dwarf Alberta spruce fair far better than other plants in these uses. You’ll tend to use far more pieces of raw material for something like this because you have to really pick and choose the best pieces that will hold together in the piece.
Other Materials
If you don’t have the ability to hunt for and find your own greens for free, pay a visit to any garden center that sells Christmas greens, and examine their selections. Popular plants to include are variegated (and regular) boxwood, tallow berries, sugar cones, incense cedar, and blueberry juniper. Curly willow is a great addition to add some whimsical height to an arrangement, and if you can find it this late in the year, bittersweet is an excellent addition. But be careful with that last one! It can be toxic to animals.
Show That Thing Off
So there you have it, a wonderful and almost entirely cost-free winter decoration. It has a good holiday vibe to it and still reflects my own tastes and gardening preferences – and your own version can easily reflect your own as well. Don’t ever feel like a beautiful and high-quality winter piece like this is out of reach. With a little creativity and hard work, and a lot of love, you can devise your own craft. And for another fun project, be sure check out out ideas for a DIY indoor holiday flower centerpiece! Photos by Matt Suwak, © Ask the Experts, LLC. ALL RIGHTS RESERVED. See our TOS for more details. Product photos via kedudes, Dashington, Wilt-Pruf, and Juvale. With additional writing and editing by Allison Sidhu.